Sunday, September 30, 2012

buttoned baby wrap {knit}


I knitted this baby wrap for Timmy before he was born.  I love it.  It seems so warm and I knew I would love holding him in it.  I was waiting to post this until I got a photo of him in it because I just couldn't do the project justice without a real baby inside.  Unfortunately, I never got the chance to see him in it. 

I wish I would have thought to bring it with us to the hospital when he was born, but of all the helpful information provided by the nurses, something personal to wrap him in wasn't mentioned.  When we held him, he was dressed in really cute zipper jammies and wrapped in a blanket, but it would have been nice to have him wrapped in something personal.  It just didn't cross my mind.  And now that I think about it, my other two boys were clothed in a generic white shirt and a diaper after they were born.  So the clothes that Timmy wore must have been something special just for him provided by the hospital for special circumstances.  That was really sweet.

Since I made this just for Timmy, I wanted him to have it.  We decided to bury him in it.  This way, his body would be wrapped in something highly personal, made especially for him by his loving mom.  I hope it made him smile.  In the casket, we also included a small quilt that his brothers and I had just finished the day we found out that our angel had passed.  I was never able to get a photo of that project, but I will always remember Logan helping with the ironing, Trent's sewing assistance, and that they both helped organize the quilt pattern.  We also included two small stuffed animals that the boys picked out to give their special baby brother.  We all felt a little better knowing that Timmy had so many personal items in his tiny casket.


In case anyone is interested in making one of these baby wraps, here are my notes.  This wrap turned out a little big for newborn, but I wanted something that would still fit a 3-month-old.

Cast on 62 stitches.
Work rows 1-34 flat.  Knit in the round beginning with row 35.
Rows 1-6: knit in garter stitch
Rows 7-10: work stockinette stitch with first and last 6 stitches of each row worked in garter stitch
Row 11: work stockinette stitch with first and last 6 stitches of each row worked in garter stitch; button hole at end of row 11, 21, 31
Rows 12-20: work stockinette stitch with first and last 6 stitches of each row worked in garter stitch
Row 21: work stockinette stitch with first and last 6 stitches of each row worked in garter stitch; button hole at end of row
Rows 22-30: work stockinette stitch with first and last 6 stitches of each row worked in garter stitch
Row 31: work stockinette stitch with first and last 6 stitches of each row worked in garter stitch; button hole at end of row
Rows 32-34: work stockinette stitch with first and last 6 stitches of each row worked in garter stitch
Row 35: knit garter bands together to knit in the round
Knit in the round until the entire length from top garter band is approximately 16 inches
Begin decreasing by 8’s with 1 knit row between each decrease row

Total length is around 18 inches.

yarn name: Yarn Bee Melody Bulky Wool from Hobby Lobby
yarn type: 70% wool, 30% acrylic
colorway: Vitner
yardage: ~160 yards
needle size: US 15 (10.0mm)

Friday, September 21, 2012

our third son

Exactly two weeks ago on Friday September 7, 2012, I gave birth to my third son, Timothy Grayson. We already knew at that time that we had lost him just a few days earlier.


On Tuesday of that week, just one day prior to my 36 week appointment, I grew concerned as the evening progressed and I didn't feel any movement.  Convinced I was being paranoid, I waited until after my other two sons were in bed.  I drank some juice, lay on the bed, crouched on all fours, and finally shoved my belly around trying to get him to wake up, but nothing worked.  I soon called the doctor and we arrived at the hospital around 10:30pm.

And then the unspeakable words were spoken after about 20 minutes of both listening and visually searching: "I'm so sorry, but I can't find a heartbeat."  What?  How could that be possible?  This baby was the most active baby I've had the opportunity to create and he had the most strength.  How could it all just stop?  What did I do?  What should I have done?  Too many questions and zero answers.

Instead of inducing immediately like my doctor suggested, my husband and I decided to go home that night.  It was after 11pm and we had no way to contact the neighbor who had nicely agreed to stay with the boys while we went to the hospital.  It was Logan's first day of first grade on Wednesday and Trent's preschool orientation was scheduled for Thursday.  But the real reason we didn't induce that night was because I couldn't do it.  I couldn't process what had happened.  How could anyone?  I was already nervous about labor and now I was expected to go through that pain knowing what was waiting on the other end?  I wouldn't hear my baby cry or see him look at me or feel him squeeze my finger.  I wouldn't be able to take him home to his brothers where they were anxiously waiting for their new sibling, and they would be such amazing big brothers.  I just couldn't face all that reality.

So on Friday, my husband, mother, and I returned to the hospital at 6am to start the induction of our angel.  At 7:49pm, Timmy arrived, a beautifully perfect angel.  The doctor told us that his umbilical cord had gotten tied in a knot and that it was wrapped around his neck; I don't believe either of these is always a concern, but the two together and position of the knot can make a difference.

After the doctors cleaned and dressed him, we spent several hours with our angel baby, holding him, kissing him, and telling him how much we loved him.  Many people cried.  I vomited.  I was overwhelmed with so many emotions including anger at myself that I wasn't crying.  I was devastated, but I just couldn't make the tears flow.  I was worried about my 6-year-old who was disturbed by the red color around Timmy's closed eyes.  I wasn't prepared for Timmy's look either, so I understood Logan's emotions.  But Trent seemed okay and kept trying to steal looks at his new baby brother.

When others had gone home that evening, my husband and I kept Timmy a little longer.  We took more pictures, talked to him, and just loved him for as long as we were physically able.  I dreaded goodbye but I was so tired both from physical and emotional exhaustion.  We said goodbye to Timmy around 10:30pm.  That was the hardest goodbye I have ever had to say.  My husband took my mom back to our house.  They moved me to a new room away from the maternity ward.  Then I cried.  My husband returned shortly after to stay the night with me and I continued to cry in his arms.  I cried for Timmy.  I knew he was safe in Heaven, but I mourned the loss of not only an innocent life but the loss of all my hopes and dreams for that life.  There would forever be an emptiness in my life and in my heart, and I cried knowing that I would never be able to fill it.

I gave the eulogy at my son's funeral, and I only cried at the very end.  We have received so much support from family, hospital staff, and friends that I met through both church and work.  I am convinced that if God knew this was going to happen that he has been preparing us for the last year by putting these people in our lives.  God blessed us with the strength and courage to make the decisions no parent should ever have to make, and He did this because so many people have praised Him by praying for us.

Thank you, God, for these people and their support and thank you for answering their prayers.  Thank you for Timmy, a gift and a blessing, however short we were able to touch him.  He will be forever in our hearts and on our minds.  We will love him forever and miss him always, until we get to meet him again when we join him in your Kingdom.

Saturday, September 1, 2012

newborn mossy {knit} sweater

Lots and lots of knitting these days.  We'll call it nesting since the baby is due in 5 weeks.  Really, though, I enjoy the portability of knitting and it seems there is always somewhere to go these days so I can just bring the knitting with me.


So here is my latest baby sweater.  I used the Mossy Sweater pattern from Inoriz.com.  The creator offers the pattern for free on Ravelry and it's a really great top down, one-piece raglan pattern.  I followed the pattern exactly, except that I made a short-sleeved version.  Although I used the 3-month pattern, I think this turned out to be more of a newborn size.  My gauge was slightly smaller than hers, I think because the yarn doesn't have uniform thickness.  I love this trait in yarn.  So mine turned out a little smaller but I think the baby should be able to wear it for at least a month.


This is called a Mossy Sweater because it makes use of the moss stitch, a stitch highly underrated in my opinion.  The moss stitch creates not only added interest but also more stability than garter stitch so it's a fun choice for button bands.  Although the colored stripes don't accentuate the moss stitch zig zag pattern on the lower half, you can still see the interesting pattern if you get close enough.


I absolutely love the idea of varigated yarns, but I certainly don't always love the look of them once knitted.  So I am very skeptical while I'm still learning the ropes to use a varigated yarn.  But I couldn't be happier with the striping on this yarn!  With the small size of this sweater, the colors make thick stripes and blend together effortlessly.


Buttons were the biggest challenge for me.  I decided to use up some of my shank buttons that I bought in bulk to cover with fabric because it's so fun and addicting.  I auditioned all kinds of colored and patterned fabric until I found these green plaid buttons.  I'm not sure if they are too clown-like but I needed something gender-neutral and these green ones seem to fit the bill.  I spent an hour covering buttons one night . . . and it was some of the best fun I've had lately!  You can call me a loser if you want, but I know you fellow fabric freaks out there know what I'm talking about.


yarn name: Yarn Bee Rainbow Wool from Hobby Lobby
yarn type: 86% wool, 8% acrylic, 5% mohair
colorway: Sunset
yardage: ~150 yards
needle size: US 8 (5.0mm)


Wednesday, August 22, 2012

a punch of color {in a fun hat}


This was my car craft on our return trip from Kentucky this past weekend.  I knitted this for about 5 of the 6 hours it took to drive back home and then another 2-3 hours to finish.  The problem is . . . I'm not sure I'm finished.

The pattern for this Capucine Hat as the creator calls it is available for free on Ravelry.  This is a fun and funky pattern that breaks out of the traditional circular shape of other hats.  The pattern calls for tassels to hang from the ear flaps as well as the top cap, but my 6-year-old boy insists that anything hanging from a hat screams girl.  Pom-poms on the top of a hat are acceptable but braids, tassels, or pom-poms hanging from the sides not gender-neutral.


But now I'm thinking why even make this pattern if you're going to skip such exciting embellishments?  It's just an oddly shaped hat without all the fun stuff, so now I just have to decide if I want to add some braids and a pom-pom and gift it to someone special or modify it in some other way to make it work for the intended child.


I also have to say how much I love these colors together!  The black really makes the red and blue pop.  I was aiming for boy colors but I'm not sure I hit the mark; my 3-year-old tells me he likes it, but "it's kinda girl."

Pattern Modifications:
  • worsted weight yarn
  • size US 8 circular & double-pointed needles
  • slip first stitch of each row for a neater finish
  • cast on in contrasting color then switch to main color
  • knit 2x2 rib for 2.25 inches
  • knit garter for 3 inches, decrease 1 stitch every other row until 72 stitches are left
  • join in the round before last row
  • switch to main color, knit stockinette for 1.75 inches
  • decrease by 8's every other row until 8 stitches remain
I took these modifications from some other knitters on Ravelry.  Since I used worsted weight yarn, my hat fits a child but the pattern calls calls for bulky and larger needles for an adult size.


If you are really observant, you will notice that the hat is inside out in most of these photos.  I couldn't tell with the black yarn when I put it on him, and that probably means that most other people won't be able to tell either.  That makes this hat extra special because now I can call it REVERSIBLE!

Thursday, August 16, 2012

such a hoot {knitted vertebrae baby cardigan}


Well, what do you think?  This is my first knitted cardigan.  I used to loathe knitting and preferred to crochet because it was fast and easy.  I hated the complication of two sticks and yarn, but I have always relished the look knitted items, particularly hand knit ones.  Enter the anticipation of a new baby and third trimester energy and you get a mama on a mission to knit up all kinds of tiny things, including little cozy sweaters that she swore she would never take the time to learn how to do.

This is a cardigan that is specifically designed to fit just around the back and arms and I love it.  Since I don't have much knitting experience and I'm not very fast, I can't really say if it's a quick knit but I'm sure it is compared to many other projects.  It is tiny after all and has no fussy buttonholes.  This is the perfect accessory to keep a litttle one toasty warm during the winter months.


I knew I would get bored with so much stockinette stitch in a solid color so I decided to add three little cabled owls to perch on the back. I used this Wise Old Owl hat pattern that I found for free on Ravelry from knitculture.com for an idea of how to make the owl, and then I translated the pattern to fit on three owls across the back.  My 3-year-old helped pick out the button eyes.

The Newborn Vertebrae pattern is available for free from knit.so.quaint on Ravelry. I had to adjust the pattern so I could use worsted weight yarn instead of fingering weight and I think it turned out incredibly adorable. Although it looks super tiny to me who hasn't had a baby around in a few years, I think the size is about 6 months.

In case you are interested, I casted on 36 stitches and sectioned off like so: 1 sts, pm, 8 sts, pm, 18 sts, pm, 8 sts, pm, 1 sts.  I used size US8 needles for the entire cardigan, but next time I might go down a size for the ribbing.  I needed less than a skein of Bernat Satin.  I still have about a quarter of a skein left.

Within the next couple of months, I should have a model for this little number.  I can't wait to see how it looks.


Sunday, July 1, 2012

say hello to my little friend {unicorn amigurumi}


For anyone who doesn't know, I'm not much of a trend follower.  I just make what I want, when I want without regard to what's hot.  Usually I happen upon the "newest thing" about 3-5 years after the trend is over.

So predictably, I now find myself facinated with amigurumi.  "That's so 2007" I can hear you saying and you would be right.  But it doesn't really matter.  It's not that I haven't known about amigurumi (a Japanese word meaning stuffed toy for those of you not in the know); it's just that many other events had to fall in place for me to become interested . . . I had to learn to crochet for one.


Hence, I introduce my newest little friend, Mason.  Mason is a unicorn crocheted using this free tutorial.  He was fashioned from 100% cotton.  I'm not really a fan of cotton yarn.  Even though the I Love This Cotton yarn I used is softer than Sugar and Cream yarn, it was still rough on my hands and had no give.  But I had these three coordinating babyish colors in my yarn basket, so I went with it.  And cotton is always a good choice for kids.

Meet Mason the Unicorn
  • Mason has a relaxed demeanor and a laid back attitude about life.
  • He enjoys lazy summer days and naps in the grass.
  • And best of all, he appreciates quality fabric.  Mason is shown below getting a sniff of my newest quilting project using Circa 1934 from Cosmo Cricket.


My favorite part of Mason is his mane.  The pattern unicorn is super cute in pink, red, and cream and I wasn't sure how light blue, tan, and cream would look.  But I love it!  And this was a really quick and innovative way to create such an intricate looking mane.

In case you didn't notice, I didn't give Mason any eyes.  I worked this up with the baby in mind and didn't want to add plastic safety eyes, so I just decided not to add any at all.  I also skipped the tail because I couldn't figure out how to attach it and I think he looks just as good without one. 


The last modification that I made to the pattern is that I picked up stitches for each new part instead of crocheting individual parts and then sewing them all together later.  I think this saves time and I would imagine makes a sturdier finished product, although I have nothing to compare it to.  The only part I sewed to the body was the mane because it was quick to make and sew.

Mason and I are off to watch cartoons with my 3-year-old . . . a typical late afternoon activity in such hot weather.


Friday, June 29, 2012

a knitted bear {or something like that}


Does this look like a bear?  I'm not so sure.  I purchased this pattern from BjfromNV (she has some really cute patterns . . . I just love the zebra, too), but I confess I didn't not follow the pattern completely.  I have this compulsion where I can't just follow a pattern; I have to change it here and there to make it original.  I've never been able to follow a pattern to completion without somehow altering it and I'm certain I never will.


I followed most of the written pattern, but I changed the nose and ears.  I didn't like the way the nose originally turned out.  I wanted a little more definition.  So I just re-knitted it in my own way.  The change in the ears was more of a necessity because I can't figure out the kitchner stitch.  I'm sure that since the ears were the last part I knitted, I was just tired of trying.  So, I just crocheted the ears which was super quick and easy.


My favorite parts about this pattern (and why I chose this pattern because there are soooo many bear patterns available) are the bear's feet and the assembly of the bear. 
  • The bear's feet look much more like actual paws than any other pattern I've seen.  Most legs and paws are just a cylinder with little definition.  I like the character that these paws give the bear.
  • This bear is knitted in the round and stitches are picked up from pieces already knitted to start new parts of the bear.  This means no sewing individual bear parts together: genius!  I do love to sew but when it's unnecessary, I would much rather skip it.
I used Lion Brand's Fishermen's 100% wool in Oatmeal for the bear's body.  For the darker brown accents I used I Love This Wool (100% wool) in Cocoa from Hobby Lobby.  I liked knitting with wool and I prefer the finished look of wool to acrylic and cotton.


Whether you think he looks like a bear, a mouse, or some kind of hybrid, this little guy found a good home.


Monday, May 14, 2012

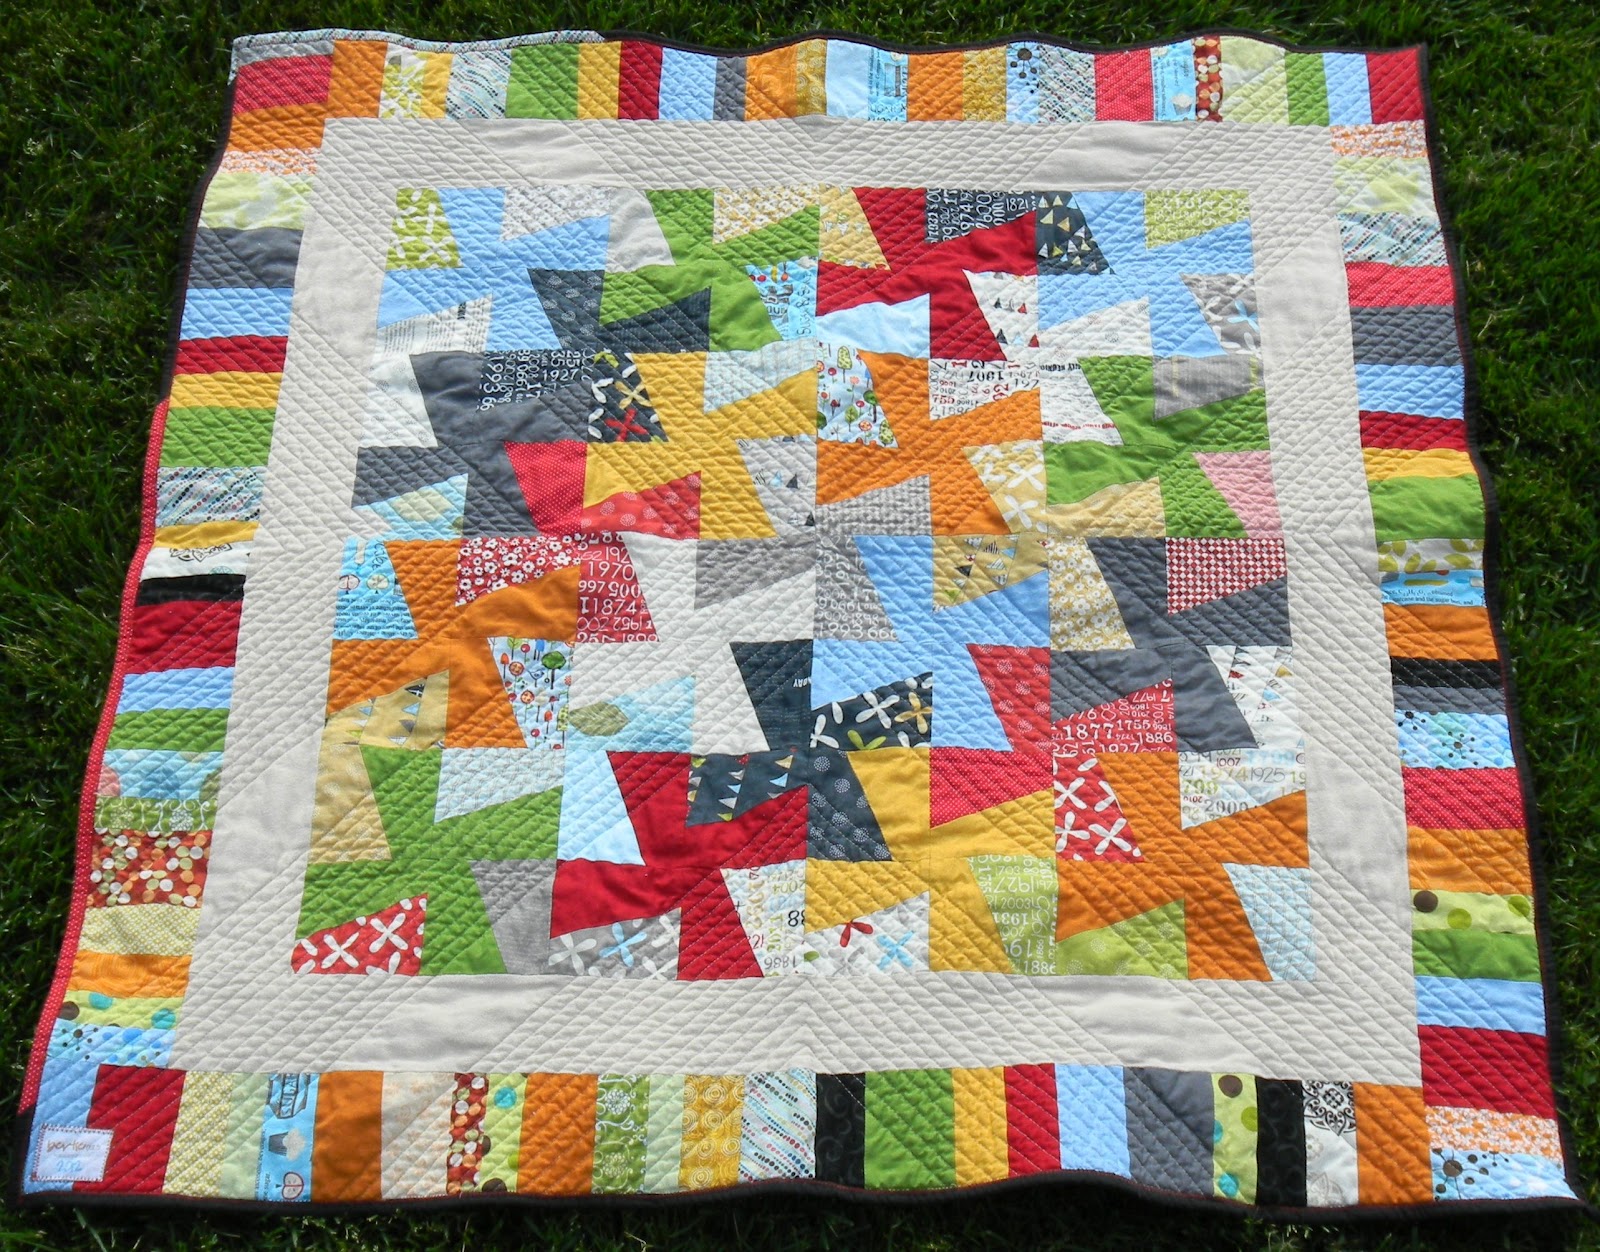
a rainbow of whirlygigs {a quilt}


When my oldest son saw the Petal Patch quilt I made for myself, with all it's bright (pink) colors, he tried to claim it for himself.  In fact, both of my boys tried to claim that quilt as their own.  But with as much as I give up to make my boys happy, that quilt was non-negotiable . . . it's all mine.

So to ease the pain, I promised to make Logan a new quilt just his size.  He told me that his new one had to be exactly the same as mine.  Since I knew dad wouldn't go for that, I decided on something very different.  I had a highly coveted Reunion by Sweetwater charm pack from my last run to the quilt shop that I decided to give up for his new quilt.  I knew I wanted a whirlygig or pinwheel type of quilt, so I just started cutting.


It wasn't until after I had cut all my charm squares that I did some research on these types of quilts.  I had no idea that many tutorials teach to sew the squares together in a grid and then re-cut to make the whirlygigs.  Since I had already cut my pieces, I stuck with my own idea of how to make the squares.  The usual way (if there is such a thing when it comes to custom quilts) may have been faster, but my way ended up working out just fine.


I decided to mix in a rainbow of solid colors as the offset to the Reunion whirlygigs.  I think the solids actually ended up taking over.  I even added another "rainbow" as a border to give the quilt even more color.  It's certainly a fun and colorful quilt and just right for a 6 year old boy.

Since this quilt measures about 44 x 44 inches, I was able to make the backing out of a full yard and a half of this airplane fabric.  I'm all for scrappy backings, but sometimes you just want something quick and simple.


I quilted in an X sort of pattern with each line 1/2 inch from the other.  I've had this pattern in my head for a while, but I always came up with an excuse not to use it.  This time, I just decided to take the plunge with and, in hind sight I guess, I could pretend that I went with an X to coordinate with the shape of the whirlygigs.  No one really needs to know that this was just a coincidence.

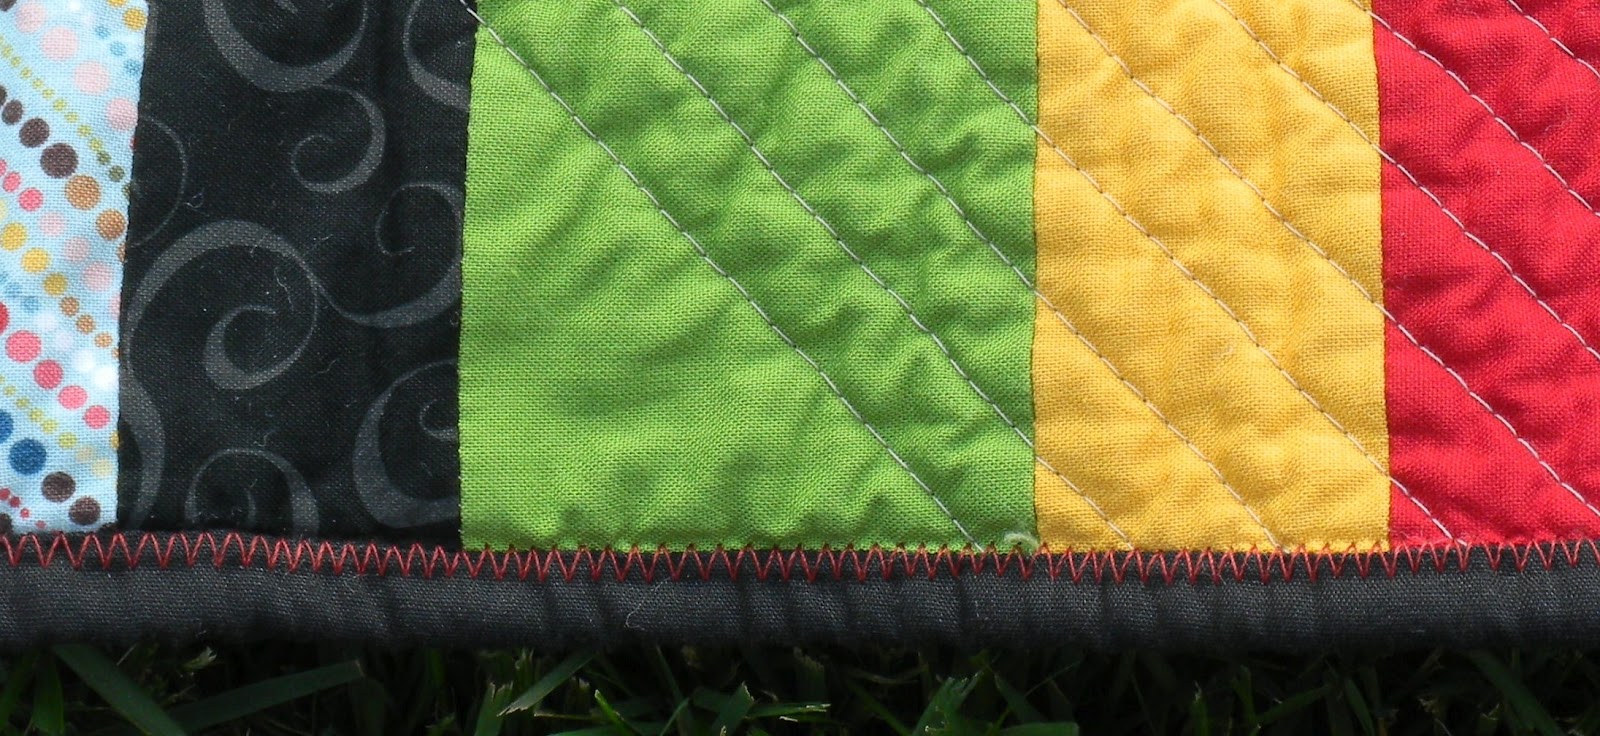
For the binding, I decided not to hand sew this time.  I found this neat technique by Stitched In Color.  She zigzags all of her quilt bindings.  I thought that for this fun boy quilt the technique would be perfect.  The only thing I changed was that I sewed the binding to the back first and then folded the binding around to the front.  This saved me a lot of time because I was able to control the look on the front of the quilt.  I'm sure that there are many quilters out there much more familiar with machine binding who could do a bang up job the way she did it, but I'm not one of them . . . yet.


Thursday, May 3, 2012

little boy slippers


Here is another forgotten project.  I crocheted this for my 3-year-old this winter but, for some reason, I never posted them.

I used the Modern Baby Loafers pattern I purchased from Holland Designs.  She is a very talented designer.  These loafers are super cute, but either I didn't follow the pattern correctly or she doesn't make corrections on the top part for larger feet.  These still turned out okay, but I'm afraid they will fall off 3-year-old feet.  One-year-old feet can probably handle the style.


Tuesday, May 1, 2012

small crochet cowl


This is really the last thing you'd like to see in Spring, but I realized that I forgot to post this several months ago when I made it.  I only had this one photo and I was going to wait to post until I had more, but that ship has now sailed.

This cowl is nice and snug.  No need to wrap it multiple times.  It just fits snuggly around the neck and is tall enough to cover the mouth and nose if needed.  I used bulky yarn so it worked up really quickly.  If you plan Christmas gifts really early (unlike me who waits until Dec 1 to start planning), then put this on your To-Do list.

I believe I used this tutorial from Crochet In Color, but I crocheted in the back ridges of the half double crochet and joined the rounds for a knitted look.  If you crochet, this is a lovely blog.  Her designs are modern and many of her patterns are free!