Showing posts with label gift ideas. Show all posts
Sunday, December 29, 2013
a brioche knit infinity scarf
My sister asked for two infinity scarves for Christmas this year. She swears that it gets chilly in Mexico. I don't believe her. Nevertheless, it's what she wanted. She will be moving stateside this year, so maybe she can use them by next winter if, in fact, she isn't telling me the truth.
Here is the first one. I used this pattern, free of course on Ravelry. I love how it turned out! Despite the worsted weight yarn, the brioche stitch makes the scarf light and airy while giving the look of reversible ribbing.
The brioche stitch pattern was actually very simple to memorize. The part I could not figure out was how to graft the two ends together to make a seamless inifinity scarf. After searching the web for a while and reading how no one else can really figure it out either, I connected the two ends with simple seam. It's definitely not the prettiest seam I've ever done, but I will just tell her to keep the seam in the back.
The scarf is a total of 52 inches long but since it's circular, it reaches my waist at 26 inches.
See my ravelry notes.
yarn name: Lion Brand Heartland
yarn type: 100% premium acrylic
colorway: redwood (red)
yardage: ~375 yards
needle size: US 11 (8.0mm)
Labels:
accessory,
gift ideas,
knit,
pattern,
scarf
Sunday, February 24, 2013
fingerless mitts {knit & crochet}
My dad requested some fingerless mitts for Christmas, but I didn't quite get around to them. So I made some for him for his birthday.
He wanted some mitts to keep his hands warm since the circulation in his arms isn't as good as it used to be. The hub (not) so willingly modeled these for me since they were too big for my hands.
I crocheted the hand and arms and held the yarn double to speed up the project. Then I picked up stitches to knit a band for the fingers and the thumb. I even added a little stockinette to the arm end of the mitts. The stockinette rolls nicely and gives the mitts a professional finish.
I used a J hook to crochet and chained 23 for the start of the mitts near the fingers. This number created a large mitt perfect for my dad but much too big for me. If I was going to make these for lady hands, I would probably only chain 19 which I would consider medium.
These fingerless mitts were very quick to whip up. The first one took about 3 hours because I had to make all the design decisions. The second didn't even take that long. Two evenings and done!
Labels:
accessory,
crochet,
gift ideas,
knit
Saturday, October 20, 2012
rigid beanie
I knitted this hat without a pattern. Hats are my sanctuary. They are so quick, and you can customize each one to make it different than the last. I just wish you could wear them all year. Then I would have a justification for all the hats I've been making lately.
Both yarns are a wool blend. I love the colors in the contrast yarn. I tried to showcase the multicolored yarn by alternating knit and purl rows in the round (which would be garter stitch if I had knit it flat) and I like the results. From the right side, the ridges make the colors pop. And I think that the gray blends into the background, leaving the fun colors in the contrasting yarn for the spotlight.
I used the same crown shaping as with this hat. I really enjoy the look of this shaping, and it keeps me interested while I'm knitting. I never get bored with it.
When I try this again, I will make it a little longer. This hat is more of a beanie and that's not what I was going for. It still looks nice and fits well, but I like my hats with a little more depth to be able to pull down further over my ears when it gets windy. Probably another inch of stockinette after the contrasting garter ridges would be perfect!
Here is the general pattern guideline for worsted weight yarn:
Main color (MC): I used Lion Brand Wool-Ease worsted in gray.
Contrast color (CC): I used Sensations It's A Wrap bulky in purple/rose.
Cast on 80 stitches in CC for adult sized hat & join to work in the round.
Change to MC.
Knit 2x2 rib for 2 inches.
Knit stockinette in MC for 1 inch.
Change to CC.
Knit one round.
Purl one round.
Alternate knit and purl rounds for 3 inches. Be sure to end with a purl row.
Change to MC.
Knit stockinette for 1 inch.
Shape crown as desired.
Next time, I might try these changes:
1/2 inch stockinette in main color before ridges instead of 1 inch
3 inches stockinette in main color after ridges before decreasing
yarn name: Lion Brand Wool-Ease (main), Sensations It's A Wrap (contrast)
yarn type: 80% acrylic, 20% wool (main); 75% nylon, 25% wool (contrast)
colorway: Gray (main); Purple/Rose (contrast)
yardage: ~100 yards (main); ~30 yards (contrast)
needle size: US 8 (5.0mm) circular and double-pointed
Friday, October 12, 2012
cozy new slippers
For some reason, I can't bring myself to knit for others; selfish knitting is all I can handle right now. So to continue my knitting therapy, I wanted to make myself some slippers.
I found this pattern for Non-Felted Slippers on Ravelry with really good reviews, so I decided to try it. The slippers are knit flat and then the sole and back heel are sewn together. After the first the slipper, I decided to sew the bottom sole together before adding the green color on the second slipper. Then I could knit in the round (which I prefer to knitting flat) for the rest of the slipper.
And you can't even see the seam that joins the two halves of the sole together, can you?
The slippers turned out great, but they are a little small. The free pattern was written for size 8 feet and my feet are at least a size 9 (okay, a 10 if I'm being really honest). I decided to try the pattern first before making modifications. They turned out just like they were supposed to, a size 8. So my mom happily found a new pair of slippers waiting for her when she visited last week, and I inadvertently completed some non-selfish knitting (hey, it counts).
I will try these again because they are quick and easy and really cute. And I need new slippers since the bottom in these slippers is beginning to wear out. I love this first pair of crocheted slippers, but next time I will have to double the yarn on the sole.
yarn name: sole & cuff: I Love This Wool, main: Bernat Roving
yarn type: sole & cuff: 100% wool, main: 80% wool, 10% acrylic
colorway: sole & cuff: Cocoa, main: Clover
yardage: sole & cuff: ~100 yards (held double), main: ~50 yards
needle size: US 8 (5.0mm)
Labels:
gift ideas,
knit,
pattern,
slippers
Sunday, September 30, 2012
buttoned baby wrap {knit}
I knitted this baby wrap for Timmy before he was born. I love it. It seems so warm and I knew I would love holding him in it. I was waiting to post this until I got a photo of him in it because I just couldn't do the project justice without a real baby inside. Unfortunately, I never got the chance to see him in it.
I wish I would have thought to bring it with us to the hospital when he was born, but of all the helpful information provided by the nurses, something personal to wrap him in wasn't mentioned. When we held him, he was dressed in really cute zipper jammies and wrapped in a blanket, but it would have been nice to have him wrapped in something personal. It just didn't cross my mind. And now that I think about it, my other two boys were clothed in a generic white shirt and a diaper after they were born. So the clothes that Timmy wore must have been something special just for him provided by the hospital for special circumstances. That was really sweet.
Since I made this just for Timmy, I wanted him to have it. We decided to bury him in it. This way, his body would be wrapped in something highly personal, made especially for him by his loving mom. I hope it made him smile. In the casket, we also included a small quilt that his brothers and I had just finished the day we found out that our angel had passed. I was never able to get a photo of that project, but I will always remember Logan helping with the ironing, Trent's sewing assistance, and that they both helped organize the quilt pattern. We also included two small stuffed animals that the boys picked out to give their special baby brother. We all felt a little better knowing that Timmy had so many personal items in his tiny casket.
In case anyone is interested in making one of these baby wraps, here are my notes. This wrap turned out a little big for newborn, but I wanted something that would still fit a 3-month-old.
Cast on 62 stitches.
Work rows 1-34 flat. Knit in the round beginning with row 35.
Rows 1-6: knit in garter stitch
Rows 7-10: work stockinette stitch with first and last 6 stitches of each row worked in garter stitch
Row 11: work stockinette stitch with first and last 6 stitches of each row worked in garter stitch; button hole at end of row 11, 21, 31
Rows 12-20: work stockinette stitch with first and last 6 stitches of each row worked in garter stitch
Row 21: work stockinette stitch with first and last 6 stitches of each row worked in garter stitch; button hole at end of row
Rows 22-30: work stockinette stitch with first and last 6 stitches of each row worked in garter stitch
Row 31: work stockinette stitch with first and last 6 stitches of each row worked in garter stitch; button hole at end of row
Rows 32-34: work stockinette stitch with first and last 6 stitches of each row worked in garter stitch
Row 35: knit garter bands together to knit in the round
Knit in the round until the entire length from top garter band is approximately 16 inches
Begin decreasing by 8’s with 1 knit row between each decrease row
Total length is around 18 inches.
yarn name: Yarn Bee Melody Bulky Wool from Hobby Lobby
yarn type: 70% wool, 30% acrylic
colorway: Vitner
yardage: ~160 yards
needle size: US 15 (10.0mm)
Labels:
baby,
gift ideas,
knit,
timmy
Sunday, July 1, 2012
say hello to my little friend {unicorn amigurumi}
For anyone who doesn't know, I'm not much of a trend follower. I just make what I want, when I want without regard to what's hot. Usually I happen upon the "newest thing" about 3-5 years after the trend is over.
So predictably, I now find myself facinated with amigurumi. "That's so 2007" I can hear you saying and you would be right. But it doesn't really matter. It's not that I haven't known about amigurumi (a Japanese word meaning stuffed toy for those of you not in the know); it's just that many other events had to fall in place for me to become interested . . . I had to learn to crochet for one.
Hence, I introduce my newest little friend, Mason. Mason is a unicorn crocheted using this free tutorial. He was fashioned from 100% cotton. I'm not really a fan of cotton yarn. Even though the I Love This Cotton yarn I used is softer than Sugar and Cream yarn, it was still rough on my hands and had no give. But I had these three coordinating babyish colors in my yarn basket, so I went with it. And cotton is always a good choice for kids.
Meet Mason the Unicorn
- Mason has a relaxed demeanor and a laid back attitude about life.
- He enjoys lazy summer days and naps in the grass.
- And best of all, he appreciates quality fabric. Mason is shown below getting a sniff of my newest quilting project using Circa 1934 from Cosmo Cricket.
My favorite part of Mason is his mane. The pattern unicorn is super cute in pink, red, and cream and I wasn't sure how light blue, tan, and cream would look. But I love it! And this was a really quick and innovative way to create such an intricate looking mane.
In case you didn't notice, I didn't give Mason any eyes. I worked this up with the baby in mind and didn't want to add plastic safety eyes, so I just decided not to add any at all. I also skipped the tail because I couldn't figure out how to attach it and I think he looks just as good without one.
The last modification that I made to the pattern is that I picked up stitches for each new part instead of crocheting individual parts and then sewing them all together later. I think this saves time and I would imagine makes a sturdier finished product, although I have nothing to compare it to. The only part I sewed to the body was the mane because it was quick to make and sew.
Mason and I are off to watch cartoons with my 3-year-old . . . a typical late afternoon activity in such hot weather.
Labels:
amigurumi,
baby,
crochet,
gift ideas,
kids,
pattern,
stuffed toy
Friday, June 29, 2012
a knitted bear {or something like that}
Does this look like a bear? I'm not so sure. I purchased this pattern from BjfromNV (she has some really cute patterns . . . I just love the zebra, too), but I confess I didn't not follow the pattern completely. I have this compulsion where I can't just follow a pattern; I have to change it here and there to make it original. I've never been able to follow a pattern to completion without somehow altering it and I'm certain I never will.
I followed most of the written pattern, but I changed the nose and ears. I didn't like the way the nose originally turned out. I wanted a little more definition. So I just re-knitted it in my own way. The change in the ears was more of a necessity because I can't figure out the kitchner stitch. I'm sure that since the ears were the last part I knitted, I was just tired of trying. So, I just crocheted the ears which was super quick and easy.
My favorite parts about this pattern (and why I chose this pattern because there are soooo many bear patterns available) are the bear's feet and the assembly of the bear.
- The bear's feet look much more like actual paws than any other pattern I've seen. Most legs and paws are just a cylinder with little definition. I like the character that these paws give the bear.
- This bear is knitted in the round and stitches are picked up from pieces already knitted to start new parts of the bear. This means no sewing individual bear parts together: genius! I do love to sew but when it's unnecessary, I would much rather skip it.
Whether you think he looks like a bear, a mouse, or some kind of hybrid, this little guy found a good home.
Labels:
amigurumi,
gift ideas,
kids,
knit,
pattern,
stuffed toy
Tuesday, May 1, 2012
small crochet cowl
This is really the last thing you'd like to see in Spring, but I realized that I forgot to post this several months ago when I made it. I only had this one photo and I was going to wait to post until I had more, but that ship has now sailed.
This cowl is nice and snug. No need to wrap it multiple times. It just fits snuggly around the neck and is tall enough to cover the mouth and nose if needed. I used bulky yarn so it worked up really quickly. If you plan Christmas gifts really early (unlike me who waits until Dec 1 to start planning), then put this on your To-Do list.
I believe I used this tutorial from Crochet In Color, but I crocheted in the back ridges of the half double crochet and joined the rounds for a knitted look. If you crochet, this is a lovely blog. Her designs are modern and many of her patterns are free!
Labels:
accessory,
clothes,
crochet,
gift ideas,
pattern
Monday, December 26, 2011
a lone sock monkey
The monkeys I made for a friend's mission in Israel turned out super cute! Unfortunately, the amazing photos that the hub took of them hanging in trees and sitting on top of fences before he shipped them were lost forever when my 5-year-old pressed the 'delete all' button on the camera. Even the are-you-sure-you-want-to-delete-all-photos warning didn't stop him. So I don't have any photos of my hard work.
But when a friend saw what I was doing, she asked me to make one for her daughter for Christmas. I almost ran out of time, so I had to settle with these knee high, brown and creme striped socks from Walmart. I was looking for something a little more colorful (it's not often I get to sew for girls), but I think this monkey looks a little more like a traditional sock monkey with these colors.
I used this tutorial for all the monkeys I made. I just make the ears a little bigger.
For Pepper here, I gave her yarn eyes in the shape of an X. I used buttons for the eyes on the other ones I made. I also thought she could use a modern scarf/cowl to girl her up a little, so I wrapped some extra yarn around loosely around her neck.
But when a friend saw what I was doing, she asked me to make one for her daughter for Christmas. I almost ran out of time, so I had to settle with these knee high, brown and creme striped socks from Walmart. I was looking for something a little more colorful (it's not often I get to sew for girls), but I think this monkey looks a little more like a traditional sock monkey with these colors.
I used this tutorial for all the monkeys I made. I just make the ears a little bigger.
For Pepper here, I gave her yarn eyes in the shape of an X. I used buttons for the eyes on the other ones I made. I also thought she could use a modern scarf/cowl to girl her up a little, so I wrapped some extra yarn around loosely around her neck.
Labels:
gift ideas,
kids,
pets,
sewing,
transformation
Sunday, November 6, 2011
donation project for kids
For the last couple of hours I've been working on cutting up socks to make sock monkeys for a donation projects. A friend is collecting sock monkeys for kids where she does mission work in Tel Aviv, Israel.
I'm using this tutorial to make the monkeys. (There is also a tutorial for making an adorable sock cow!) I've cut and sewn all the pieces to make 5 monkeys. Later during the Sunday night shows, I will stuff all the pieces and sew the monkey parts together. If I play my cards right, the hub just might help me stuff.
Labels:
gift ideas,
kids,
sewing,
volunteer
Sunday, October 9, 2011
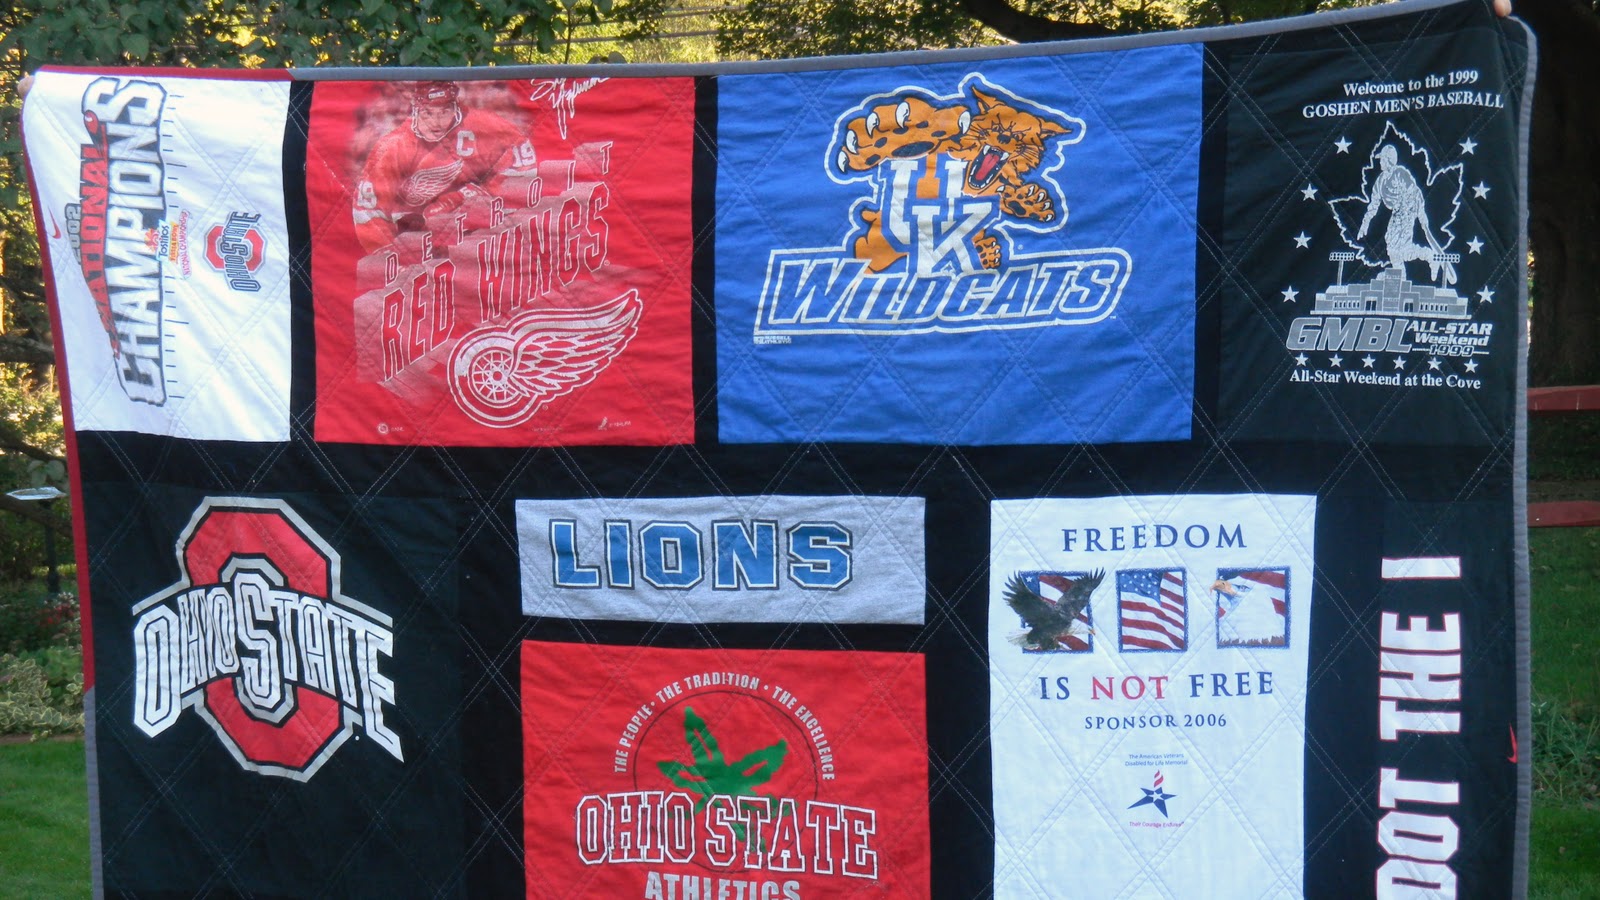
t-shirt quilt for the hub {complete . . . finally}
I finished the top for this quilt more than 8 months ago. I even basted the layers together, but then it just sat in a neatly folded pile for 8 months until I got around to quilting it. Sad, just sad. (But what's even sadder is that I have a small wall hanging that might break that record.)
This was a project for the hub. I rarely get to make anything for him because he is, well, a man. I have plenty of experience sewing for little boys, but grown up boys are altogether different. It's hard to find cool quilting cotton for a man and solids just aren't that fun. So a t-shirt quilt is a perfect gift and he requested it so I just had to do it. With a project like this, most of the fabric is provided by him, so it will fit his personality just right.
This quilt was supposed to be his birthday gift this year. Since his birthday was back in January, I guess I missed that deadline, but I am happy to say that I finished it up just in time for cooler weather. And since I backed with a flannel bed sheet and put a layer of cotton batting in the middle, this sucker should keep him plenty warm this winter.
I cut the t-shirts all different sizes, so it was a bit of a challenge to get the layout to work. I used a black solid for the sashing to separate the t-shirts. I did not use interfacing on the backs of the t-shirts.
I quilted this in grey thread using double diagonal lines to make diamond shapes. I actually used painters tape to help guide my straight lines. I'm sure others have done this, but this also served an additional purpose. The tape kept the knit t-shirts in place while I quilted (even with the walking foot, the shirts shifted), so I didn't really need the interfacing.
You will never find two t-shirt quilts exactly the same. I think they always turn out a little quirky because the designs and colors aren't always complementary. But I guess it's that kind of originality that makes them such a hit. And it's a great way to preserve old or outdated t-shirts that you just can't bare to part with.
Labels:
clothes,
gift ideas,
quilt,
sewing,
transformation
Friday, June 24, 2011
a row of baby shoes :: another baby shower gift
I am told cloth baby shoes are all the rage right now. I wouldn't know much about baby rages (my kids are out of the baby stage), but I do agree that cloth baby shoes are absolutely adorable. I also consider myself a practical person, so I waivered on these because of how impractical baby shoes really are.
But when you are using your own sweat and tears (and not spending $30+ a pair), practicality goes out the window. And you have to admit that these are totally worth the gamble.
I purchased the Cameron Baby Sneakers pattern from SewingWithMe7 on Etsy. This shoe pattern is about the only one I could find for boys. I think this pattern could be used for either gender, but it's not overly girly like a lot of others. This pattern is just plain cool! The pattern sizes included in the purchase range from 0-3 months to 18-24 months . . . a really large range if you ask me, so I could make all kinds of shoes for kids up to 2 years old. I used the 3-6 month size for these.
Since we are expecting twin nephews in the next couple of months, I had to go with 4 pairs of shoes. I really don't think that's enough, but these tiny objects are surprisingly time-consuming. My speed improved toward the end, but there is so little room for error.
I pretty much followed the pattern to the letter except for the closures. I think the pattern uses velcro which I used for one pair, but I tried to mix it up a little. I also used a neutral linen for the sole to make them look a little more like shoes.
A brownish-green pair with constrast stitching and snap closures . . .
A blue striped pair with a loop and button closure . . .
A green print pair with orange contrast stitching and velcro closures . . .
And a brownish-yellow plaid pair with loop and yellow button closures (my personal favorite) . . .
I think these turned out pretty neat. And my sister-in-law was very pleased with them. I hope these keep tiny feet warm because they will definitely keep them stylish.
But when you are using your own sweat and tears (and not spending $30+ a pair), practicality goes out the window. And you have to admit that these are totally worth the gamble.
I purchased the Cameron Baby Sneakers pattern from SewingWithMe7 on Etsy. This shoe pattern is about the only one I could find for boys. I think this pattern could be used for either gender, but it's not overly girly like a lot of others. This pattern is just plain cool! The pattern sizes included in the purchase range from 0-3 months to 18-24 months . . . a really large range if you ask me, so I could make all kinds of shoes for kids up to 2 years old. I used the 3-6 month size for these.
Since we are expecting twin nephews in the next couple of months, I had to go with 4 pairs of shoes. I really don't think that's enough, but these tiny objects are surprisingly time-consuming. My speed improved toward the end, but there is so little room for error.
I pretty much followed the pattern to the letter except for the closures. I think the pattern uses velcro which I used for one pair, but I tried to mix it up a little. I also used a neutral linen for the sole to make them look a little more like shoes.
A brownish-green pair with constrast stitching and snap closures . . .
A blue striped pair with a loop and button closure . . .
A green print pair with orange contrast stitching and velcro closures . . .
And a brownish-yellow plaid pair with loop and yellow button closures (my personal favorite) . . .
I think these turned out pretty neat. And my sister-in-law was very pleased with them. I hope these keep tiny feet warm because they will definitely keep them stylish.
Labels:
accessory,
baby,
gift ideas,
pattern,
sewing
Tuesday, June 21, 2011
baby shower gift :: simple burp cloths
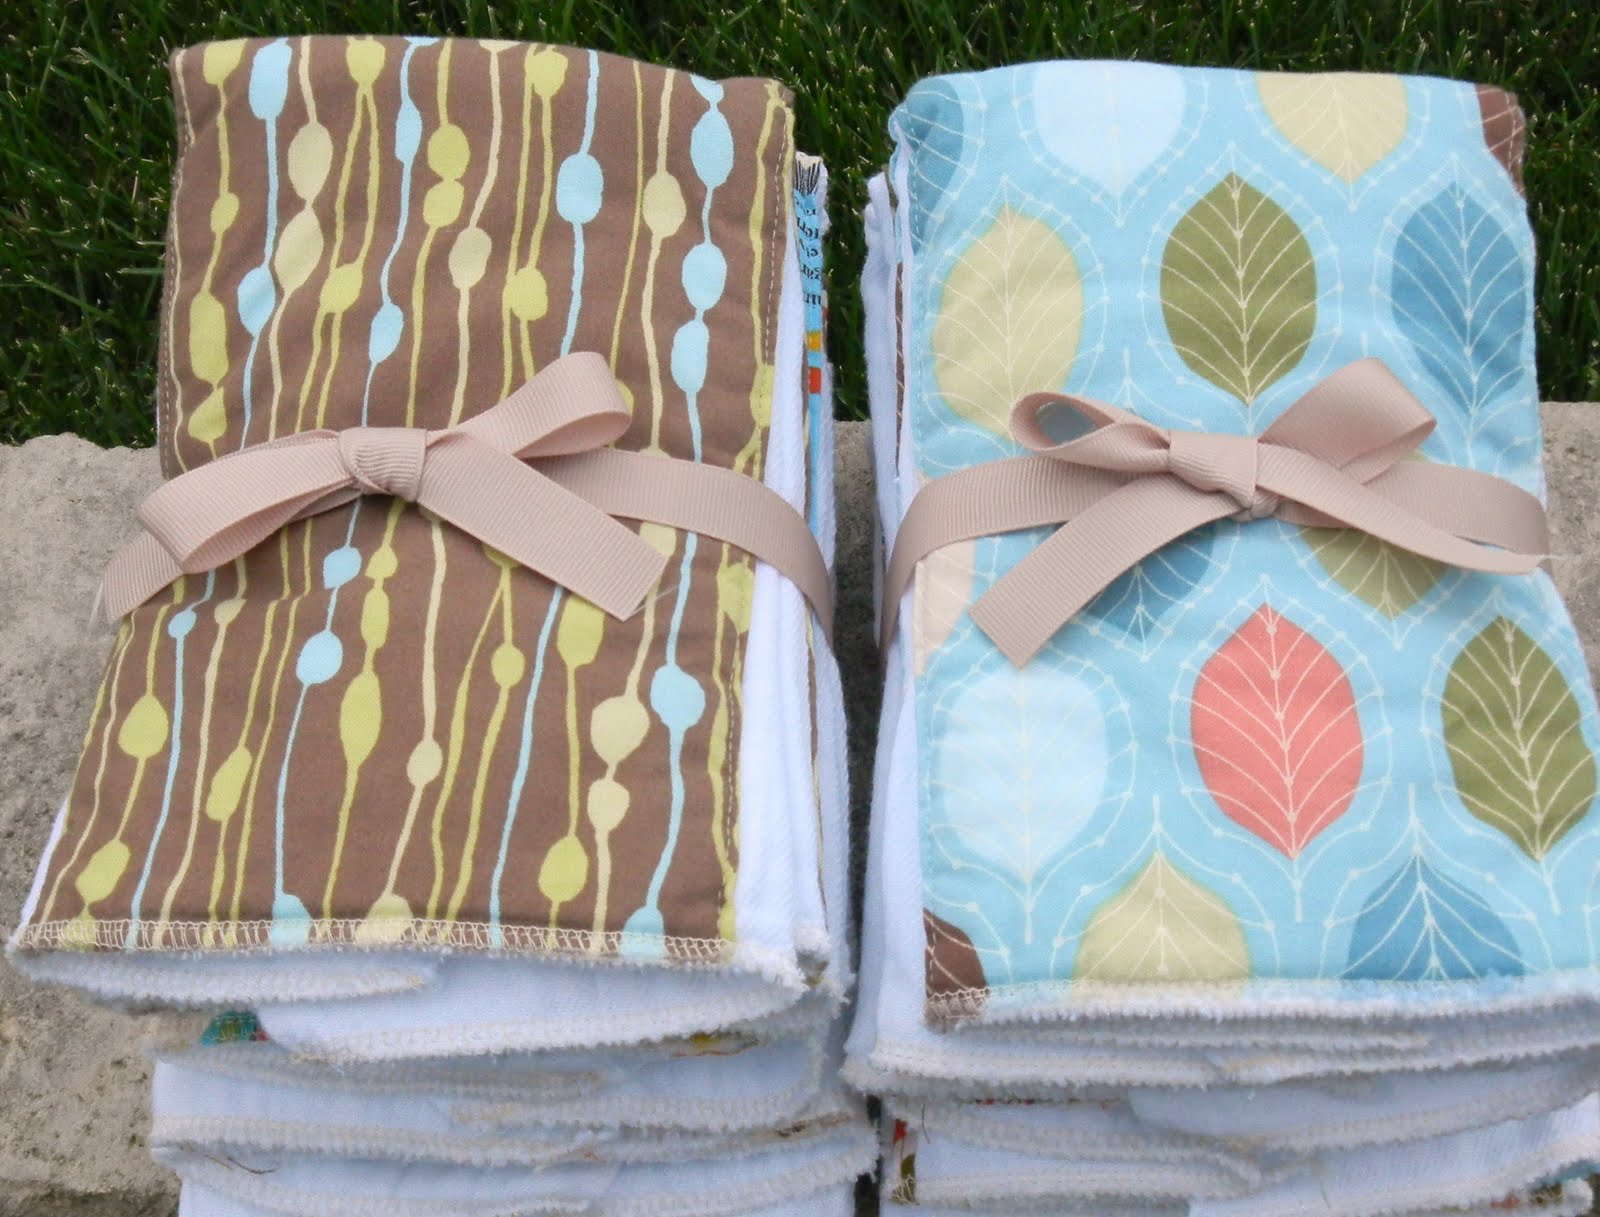
These burp cloths make excellent baby shower gifts.
I've seen this tutorial everywhere, like here and here. I originally thought it was just too simple to give as a baby shower gift, but then I realized that many people don't realize how little effort these require. Plus, they use very little fabric, so they are both inexpensive and a potential scrap buster.
Pieces of fabric are sewn to the middle of commerical tri-fold burp cloths. I bought mine at Target: 12 for $17. From quarter-yard pieces of fabric, I cut 6-inch wide pieces. So my fabric pieces ended up about 17 or 18 inches by 6 inches. Then I turned under the long side seams 1/2 inch, ironed the seams and pinned the fabric to the middle of the unfolded burp cloth (the long way). Then I sewed the two pieces together close to the long edge of the fabric.
To finish the short edges, I serged them across the entire cloth. These are as quick to make as you are hoping they are. I had 8 done in about an hour or so. This pile is for a set of two little nephews arriving soon, so I tried to keep the fabrics boyish (or at least gender-neutral).
I've seen this tutorial everywhere, like here and here. I originally thought it was just too simple to give as a baby shower gift, but then I realized that many people don't realize how little effort these require. Plus, they use very little fabric, so they are both inexpensive and a potential scrap buster.
Pieces of fabric are sewn to the middle of commerical tri-fold burp cloths. I bought mine at Target: 12 for $17. From quarter-yard pieces of fabric, I cut 6-inch wide pieces. So my fabric pieces ended up about 17 or 18 inches by 6 inches. Then I turned under the long side seams 1/2 inch, ironed the seams and pinned the fabric to the middle of the unfolded burp cloth (the long way). Then I sewed the two pieces together close to the long edge of the fabric.
To finish the short edges, I serged them across the entire cloth. These are as quick to make as you are hoping they are. I had 8 done in about an hour or so. This pile is for a set of two little nephews arriving soon, so I tried to keep the fabrics boyish (or at least gender-neutral).
Labels:
accessory,
baby,
gift ideas,
sewing
Friday, April 22, 2011
bridal shower gift :: casserole carrier
Here is another gift that I made for the same upcoming bridal shower. This bride loves to cook, so she will make great use of this casserole dish carrier.
This carrier is made from a single cut of fabric, quilt batting, and a lining (I used white terry cloth) to resemble a "+" shape. You can made this carrier using 1 yard of each of the three layers. Each of the four sides folds into the center to surround the casserole dish. The sides are secured with Velcro.
Another note: I used webbing for the straps instead of fabric. I took 2 yards of webbing and sewed the ends together to form a circle. I stretched the circle into more of an oval shape with two long straight sides and sewed these long straight sides to bottom of the carrier. If you use fabric straps like the 2 Little Hooligans tutorial does, you might need a little more fabric.
This was a quick project. I find myself truely needing one of these only about twice per year, but if I had a customized carrier in a cool modern print, I might just have to find a reason to bake casseroles more often.
Labels:
bag,
food,
gift ideas,
home,
sewing
Wednesday, April 20, 2011
bridal shower gift :: oven mitts
How about some new oven mitts for a bridal shower gift? This bride loves to cook so she should really appreciate this gift. I adore this pattern with the thumbs on the front!
I lined the mitts with terry cloth for a luxurious feel on the inside and an extra bit of protection from the oven heat. I also have to admit that I'm getting pretty good at bias tape. I can't believe how straight my lines are getting.
I used this tutorial from The Crafty Cupboard. She didn't post a pattern, so I had to size my own. Here are a couple of notes I would add to her tutorial.
And I just love this fabric.
I lined the mitts with terry cloth for a luxurious feel on the inside and an extra bit of protection from the oven heat. I also have to admit that I'm getting pretty good at bias tape. I can't believe how straight my lines are getting.
I used this tutorial from The Crafty Cupboard. She didn't post a pattern, so I had to size my own. Here are a couple of notes I would add to her tutorial.
- Be sure to clip a triangle in the seam allowance where all three pattern pieces meet to reduce the bulk.
- It's irritating when linings slide out, so I sewed the lining and outside pieces together at the very top. Turn both the lining and outside wrong sides out and press the backs of each (the side without the thumb piece) together. I just zigzag stitched in the seam allowance. Now the lining should stay inside.
And I just love this fabric.
Labels:
food,
gift ideas,
home,
sewing
Subscribe to:
Posts (Atom)