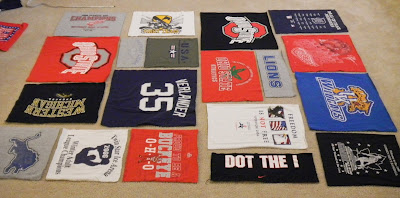
I finished the t-shirt quilt top for the hub just like I committed to on Amy's blog. I just didn't get to the next part . . . quilting it before his birthday. It's basted and ready to be quilted someday soon.
These t-shirt quilts are great for at least two things: preserving memories and making a quilt top without buying all that fabric. And for me they provide a bonus by offering lots of scraps to use to make smaller t-shirts for little boys (or girls, but I don't have any of those).
For anyone interested or who may be interested in the future, here is how I put the top together:
(A word of caution for beginners: this is absolutely a project you can do, but just be aware that knits--the t-shirt fabric--slip around a little more than wovens. So if you have trouble with the knit, do let it turn you off to quilting. Wovens are usually easier to work with in a quilt.)
I had 20 t-shirts that I cut up but I only ended up using 18 of them for this project. And I only used the front of each. This is a pretty big quilt, so you could probably get a way with fewer, especially if you used the entire front of the t-shirt and the back (even if it's just a solid color, it can still work well in the quilt).
Cut cup the sides of the first shirt. Cut around the sleeve and the neck band, so you have a front and back panel from each shirt. Repeat for all shirts.
Cut out the t-shirt designs as you please. Many of the t-shirt quilts I've seen use the same measurements for each quilt block. I tried to cut all sides at any of 6.5, 12.5, and 18.5 inches. Sometimes the shirt or design size didn't lend itself to any of these measurements, so I had to be flexible here.
At times, I used two acrylic rulers side by side (a 12.5 inch square and a 6 by 24 inch) to extend the length more easily and to ensure I could center the design on the square. I also had to slide the 12.5 inch square ruler down to get the entire design on this square. This block measures 18.5 by 18.5 inches.
Don't forget to look at the tags and on the back or bottom of the shirt for treasures like these! These can be incorporated into the quilt any way you like. The grey patch still attached to the shirt scrap will be appliqued on the front and the other two tags will be sewn into the binding.
Once all the blocks are cut, sort them by relative size.
Now comes the intellectual part. You just have to start laying them out and moving them around until you get a square or rectangular-shaped top. I had to move mine around about six times before I settled on a design. I tried to keep them in straight rows because I knew that would be easier than a random pattern, especially since I decided to add sashing between each block.
The rows weren't perfectly even, so I had to trim some blocks a little to match the length of the shortest block in that row. With a few smaller blocks, I decided to add extra sashing to make the block long enough to match the other blocks in the row. But one of the good things about working with knits is that they stretch. So if the difference in block measurements was within 1/4 inch, I left the blocks alone.
You can see in the photo below how the bottom right square is about 5 inches longer than the rest of the row. I liked the look of the three blocks in a column, so I had to live with trimming this one down. I just had to make sure that the design still fit on the block and I decided to wait until after it was quilted to trim it so I wouldn't risk trimming off too much.
You could just sew each block in the row to the next block (right sides together) for each row and then sew the rows together. I decided to add woven sashing to help highlight each block and give the quilt top more stability. I used a solid black Kona cotton for my sashing. Adding sashing requires a bit of basic math.
Pick one of your rows, the one that looks the longest. Add together the width of each block in that row.
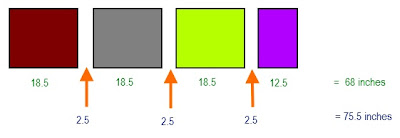
For instance, my longest row had three 18.5 inch blocks and one 12.5 inch block. Summing these widths together equals 68 inches without sashing. I wanted to add 2 inch sashing between each set of blocks, so I had to cut 2.5 inch blocks for a 1/4 inch seam allowance on both sides. Add 3 x 2.5 to the 68 inch block total gave me 75.5 inches total for the longest row (this is the measurement before sewing so it won't be quite this long).
I then had to make each row equal 75.5 inches. So if my next row of blocks totaled 60 inches, I would need 10.5 inches of sashing. Split between three sections of sashing, each block of sashing would be 3.5 inches wide (10.5 / 3).
If you have 5 blocks in a row instead of 4 like all of mine, you can do the same calculations, but add 1 inch to the total needed for sashing. This is due to the extra inch lost in seam allowances for additional blocks. So if the total needed for sashing is 11 inches, add 1 inch to make 12 inches. Then divide this total by 4 sections of sashing to get 3-inch wide sashing for each section.
The length of each section of sashing should be equal to the length from top to bottom of the blocks it will be sewn to.
Sew all of these together, press each seam, and sew a long piece of sashing between each of the rows.
Add you're done.
Happy quilting!


it looks great; t-shirt quilts are fun to do. you didn't interface the back of the t-shirts? I've done that on the ones I have done; it keeps the shirts from stretching
ReplyDeleteSo this is exactly the project I've been "attempting" for the past 3 years! I have the cutouts and that's as far as I've made it, so I'm gonna use your tips and (hopefully) start soon! :) Love you!
ReplyDelete