Showing posts with label challenge. Show all posts

Tuesday, January 1, 2013

striped knit christmas stockings


So the hub said to the boys one day, "I think mommy should knit us some Christmas stockings."  If I wasn't so excited that he (pretty much) requested something from me, the more logical part of me would have told him that he was crazy if he thought it would happen before this Christmas.  But few challenges have passed me by without some sort of effort.

The Challenge
  • knit 5 Christmas stockings before Christmas, preferrably at least a week before Christmas day
  • all five must be similar to show uniformity but not exactly the same
  • they must be oversized (this is one of the hub's problems with our current stockings)
  • the pattern must be simple enough to work without too much thought
  • they must be knit in the round (I refuse to knit flat when I don't have to)
Believe it or not, Ravelry doesn't have that many stocking patterns that do not include fair isle.  Don't get me wrong.  I would love to make 5 stockings using fair isle but that doesn't really fit any of my specs.  So I had to improvise.  And because I've never made a sock before, I really had to work at the toe and the heel to get them right.


These are the three that I managed to finish before Christmas, one for each of my three boys.  The blue is for Logan, the green for Trent, and I chose purple for Timmy's stocking.  For all the stockings I used stash yarn.  Timmy's stocking is purple (which I've chosen as his signature color because it would never be claimed by any other boys in my house) and I used leftover yarn from my Comfort Buttony that I knitted for myself; that was a special way for me to tie the two of us together.


 These stockings definitely fit the bill.  I used the same pattern for each but, depending on the yarn, the sizes are a little different.  Trent's stocking is the smallest at 16 inches around and 20 inches long while Timmy's stocking measures about the same 16 inches in circumference but a whopping 24 inches long.  That's more than half the length of my 6-year-old!  So these are definitely big enough for Santa to fit all the Christmas goodies!


Merry Christmas to my three darlings.


Tuesday, February 15, 2011

i didn't win a sewing machine, but . . .

I was one of the 10 finalists!  Out of 871 total entries!  I am indescribably excited.  I didn't do a lick of work all day because I was so excited.  Oh well!

Zip on over to Prudent Baby to see all the finalists and the winners.


As a really fun surprise, Valori Wells who designs for Free Spirit donated a yard of her fantastically gorgeous fabric to each of the 8 finalists who didn't win the sewing machines.  What a wonderful girl!  So I should receive my yard of randomly chosen fabric in the mail soon.  And check out Valorie's website.  She has 3 free quilt patterns posted that all showcase her fun fabrics.  This one is my personal favorite.


Now how do I explain to the hub that it's simply an injustice to own only one yard of this beautiful fabric?

Wednesday, February 9, 2011

two season potholder


This is my entry in the Prudent Baby Sewing Machine Double Down contest to win a new Brother sewing machine.  Of course my entry is last minute (today is the last day to enter), but if I don't wait until the last minute I will spend forever trying to perfect an idea, driving myself crazy to get every detail right.  Until, that is, it's the last minute anyway and I have no more time.

I call this a two season potholder not because you can use it for two seasons per year.  That would be ridiculous.  I named this one "two season" because, to me, each side resembles a tree in a different season.  This side with the buttons looks like a tree in spring with lots of colored, budding leaves.
 

After I placed the purple tree on this polka-dot fabric (it's Porcelina by Michele D'Amore for Marcus Fabrics that I picked up during my first trip to my local fabric shop a few months ago), I realized that I had another season: winter.  This tree reminds me of a bare tree in winter . . . with fabulous colored snow!


I wonder if these colors are too 1970's shag?  I really like the dark purple terry.  It's definitely not something I choose often.  I really didn't mean to mix so many fabrics, but I just went with what looked good at the moment.  Last (very late) night, I thought that these fabrics didn't really mix that well, but after I looked at it this morning, I decided that not only does it really not matter but I also kind of like these colors together.  After all, isn't one definition of creativity making uncommon combinations work together in a fun new way?  I thought so, too.


I followed Prudent Baby's tutorials here and here because I believe the rules required it.  I always forget how thick potholders can be with all these layers.  It really takes patiences and awareness to sew all these layers correctly the first time . . . two things that seem to disappear with every passing minute after, let's face it, 9pm.  And for a little extra fun, the loop I added at the top was made from the selvedge of the Porcelina fabric.  Now I can remember where to find more.

Wish me luck in the contest, unless of course you entered a potholder, too.  I will be hopping over to Prudent Baby on Monday February 14 to see the winners.  I'm sure they won't disappoint!


Saturday, January 29, 2011

t-shirt quilt top {complete}


I finished the t-shirt quilt top for the hub just like I committed to on Amy's blog.  I just didn't get to the next part . . . quilting it before his birthday.  It's basted and ready to be quilted someday soon.

These t-shirt quilts are great for at least two things: preserving memories and making a quilt top without buying all that fabric.  And for me they provide a bonus by offering lots of scraps to use to make smaller t-shirts for little boys (or girls, but I don't have any of those).

For anyone interested or who may be interested in the future, here is how I put the top together:

(A word of caution for beginners: this is absolutely a project you can do, but just be aware that knits--the t-shirt fabric--slip around a little more than wovens.  So if you have trouble with the knit, do let it turn you off to quilting.  Wovens are usually easier to work with in a quilt.)

I had 20 t-shirts that I cut up but I only ended up using 18 of them for this project.  And I only used the front of each.  This is a pretty big quilt, so you could probably get a way with fewer, especially if you used the entire front of the t-shirt and the back (even if it's just a solid color, it can still work well in the quilt).

Cut cup the sides of the first shirt.  Cut around the sleeve and the neck band, so you have a front and back panel from each shirt.  Repeat for all shirts.

Cut out the t-shirt designs as you please.  Many of the t-shirt quilts I've seen use the same measurements for each quilt block.  I tried to cut all sides at any of 6.5, 12.5, and 18.5 inches.  Sometimes the shirt or design size didn't lend itself to any of these measurements, so I had to be flexible here.


For this one, I used my 12.5 inch square acrylic ruler to cut around three sides (both sides and top) and then slid the ruler down to add some length and cut around both sides and the bottom.  So this block measures 12.5 by 18.5 inches.


At times, I used two acrylic rulers side by side (a 12.5 inch square and a 6 by 24 inch) to extend the length more easily and to ensure I could center the design on the square.  I also had to slide the 12.5 inch square ruler down to get the entire design on this square.  This block measures 18.5 by 18.5 inches.


Don't forget to look at the tags and on the back or bottom of the shirt for treasures like these!  These can be incorporated into the quilt any way you like.  The grey patch still attached to the shirt scrap will be appliqued on the front and the other two tags will be sewn into the binding.


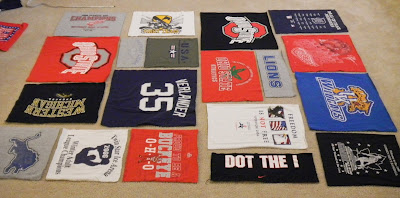
Once all the blocks are cut, sort them by relative size.


Now comes the intellectual part.  You just have to start laying them out and moving them around until you get a square or rectangular-shaped top.  I had to move mine around about six times before I settled on a design.  I tried to keep them in straight rows because I knew that would be easier than a random pattern, especially since I decided to add sashing between each block.


The rows weren't perfectly even, so I had to trim some blocks a little to match the length of the shortest block in that row.  With a few smaller blocks, I decided to add extra sashing to make the block long enough to match the other blocks in the row.  But one of the good things about working with knits is that they stretch.  So if the difference in block measurements was within 1/4 inch, I left the blocks alone.

You can see in the photo below how the bottom right square is about 5 inches longer than the rest of the row.  I liked the look of the three blocks in a column, so I had to live with trimming this one down.  I just had to make sure that the design still fit on the block and I decided to wait until after it was quilted to trim it so I wouldn't risk trimming off too much.


You could just sew each block in the row to the next block (right sides together) for each row and then sew the rows together.  I decided to add woven sashing to help highlight each block and give the quilt top more stability.  I used a solid black Kona cotton for my sashing.  Adding sashing requires a bit of basic math.

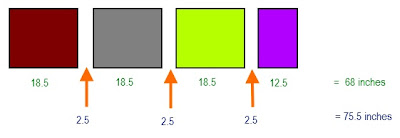
Pick one of your rows, the one that looks the longest.  Add together the width of each block in that row.


For instance, my longest row had three 18.5 inch blocks and one 12.5 inch block.  Summing these widths together equals 68 inches without sashing.  I wanted to add 2 inch sashing between each set of blocks, so I had to cut 2.5 inch blocks for a 1/4 inch seam allowance on both sides.  Add 3 x 2.5 to the 68 inch block total gave me 75.5 inches total for the longest row (this is the measurement before sewing so it won't be quite this long).

I then had to make each row equal 75.5 inches.  So if my next row of blocks totaled 60 inches, I would need 10.5 inches of sashing.  Split between three sections of sashing, each block of sashing would be 3.5 inches wide (10.5 / 3).  

If you have 5 blocks in a row instead of 4 like all of mine, you can do the same calculations, but add 1 inch to the total needed for sashing.  This is due to the extra inch lost in seam allowances for additional blocks.  So if the total needed for sashing is 11 inches, add 1 inch to make 12 inches.  Then divide this total by 4 sections of sashing to get 3-inch wide sashing for each section.

The length of each section of sashing should be equal to the length from top to bottom of the blocks it will be sewn to.

Sew all of these together, press each seam, and sew a long piece of sashing between each of the rows.

Add you're done.

Happy quilting!

Monday, January 17, 2011

my challenge this week


Amy from Amy's Creative Side is holding her monthly challenge this week.  The idea is to commit to something this week, document the commitment to make it official, and then just do it.  Then we get to link up on her blog and see what everyone else was able to complete in a week.

I spent a few hours this past weekend cutting up the hub's old t-shirts to make him a t-shirt quilt for his birthday next week.  So my challenge to myself this week is to complete the quilt top.  I will have to quilt it this weekend, so the first part of my goal is to finish the quilt top before Saturday (hopefully that doesn't mean a Friday all-nighter).

This is a fun way to set a goal.  We girls always work better in groups.  So even if you're not particularly crafty and are part of my family and are reading this post out of obligation, I challenge you, too, to commit to something this week and do it.  Come on.  It'll be fun!

Amy's Creative Side