Wednesday, March 31, 2010

quarterly donation project :: 2010 Q1


 I finished the last blankets for Project Night Night for a total of four as part of my quarterly donation project.  Each bag contains a handmade blanket, a book, and a stuffed animal.  These bags will be donated through our church to a local homeless shelter.

As time consuming as it was, I learned a lot from making four blankets in such a short period of time.
  1. Fleece works well as a backing for a cotton front but only if it's quilted.  The fleece and cotton don't form a sturdy blanket without some quilting.
  2. Closing edges of the blanket before quilting does not work. I did this to save time with the puppy blanket below, but the layers shifted while quilting.  Binding edges after quilting is a better way to go.
  3. Tighter quilting, although more time consuming, produces much better results.
  4. Free motion quilting is really a lot of fun and surprisingly relaxing.

I love this dog fabric.  It has all my favorite shades of blue and brown.  I don't think I did the print justice.  The blanket is backed with light blue fleece and I simply stitched the edges together to make a quick blanket.  But the perfectionist in me could just stop there.  Even with all the dogs, I felt it needed more.  So I tried free motion circles like with the Elephant Parade quilt, but the result is unpleasant.  I tried bigger circles, and they just didn't work. 


The front looks okay, but the back fleece is a mess.  I gave up halfway through, but my husband convinced me that the quilting was unique (yep, you definitely won't see quilting like this anywhere else).  So I plowed through and am praying that the recipient likes the front so much that he doesn't care about the back.  I should have stuck with stippling.


My sister, Laura, was kind enough to donate the animals and books for this project.  Thank you, Laura, for your generosity.  I know that the kids will love what you picked out. 


Other quilts donated for this project {Elephant Parade & Candy Swirls}. 


Sunday, March 28, 2010

candy swirls quilt :: complete


Donation quilt number two is finished!  I call this one Candy Swirls because the brightly colored circles and such remind me of candy.  And I couldn't be happier with Miss Candy!  Well, that's not exactly true.  I wish I would have left some of the printed fabric as much larger pieces (I really love that design), but I was going for scrappy-pieced columns.  I think I ended up with more of a grid pattern since the width of the swirl pieces didn't vary enough, but live and learn.

I will admit that I almost tore the top apart after I pieced it together.  I scrutinized it for a while thinking about how much I really didn't like it.  I wanted to go with white sashing for a crisp, clean look but you have to know your audience.  Kids can be kinda dirty.  Green was probably a better choice.  But as much as I didn't like it, I thought it might look different once quilted.


And man, am I glad I waited!  Since I knew I would never see this quilt again, I decided to try free motion stippling.  I've never done it before, and I thought that if it didn't turn out well, I could give the quilt away and never have to look at the nightmare again.  But I cannot believe how much I love it!  I think this has turned into my favorite quilt so far.  The stippling brings it all together and makes the quilt look like one large piece instead of a bunch of smaller (ill-placed) pieces.  And I echo my husband's sentiments when I told him how much I loved the way this one turned out: it's too bad I can't keep it.  But I'm sure it will go to a great home.


I simply went with light yellow fleece as the backing for this one.  I was trying to save time and money by avoiding the batting and backing.  Plus, these quilts are for children and are required to be crib size or smaller.  To me, that's a drag-around size, so I don't want them to be too heavy.  The fleece is soft and adds just the right amount of thinkness.

Looks like a jigsaw puzzle . . .


I will absolutely stipple again but it took me just over 4 hours to quilt this little one.  I think my stippling is tighter than others I have seen but it works with this quilt because the quilt is so small.  I should probably try to spread out the curves a little more to make it easier on myself.  As with the Elephant Parade quilt, I think the tighter curves and loops were just more comfortable for a beginner with limited space around her machine.

And look who managed to sneak into yet another photo . . .


The Candy Swirls quilt measures 38.5 x 32.5 inches and will be donated to Project Night Night along with the Elephant Parade quilt.

Saturday, March 27, 2010

fabulous new notions


I just received these in the mail from my sister, Laura!  What a lovely girl.  She sent them as a pre-thankyou for all the items she requested lately (her 28th birthday is coming up in a couple of weeks and there are about 10 things on her wish list).  But really, I feel like I'm the only one making out in this deal because not only do I have an excuse to buy new fabric and make stuff, I get a ton of new accessories to use!


Each of these supplies was purchased on Etsy.  These YKK zippers are sold by kandcsupplies.  They have an assortment of colors and sizes for about $0.50 each.  The scottie dog appliques and swivel clasps came from twpmango.  There are all kinds of different swivel clasps and appliques on that site.  I just might have to take a visit myself.

Saturday, March 20, 2010

elephant parade quilt :: complete


Here is the completed Elephant Parade Quilt.  I decided to call it a quilt because I spent a lot of time quilting it.  I originally thought that I would quilt in large circles to take up a lot of space but that is much easier said.  Since this was my first free motion quilting experience, I found it more natural to quilt in small to tiny circles.

I loved the free motion! It took a few circles to get the hang of it, and the shape of the larger circles was more difficult to control.  I'm sure it would have turned out more uniform if I wouldn't have had to stop to sleep on three separate nights.  But I think the best part about this circular, or pebble, design is that it doesn't have to be perfect.  I traced each circle twice and I actually think it looks better when the circles don't match up.  It gives the quilt a more improvised look. 


I ended up using four different thread colors on this quilt: light pink, medium purple, light purple, and apple green.  I didn't mean for that to happen, but I kept running out of thread.  I once ran to the store for more purple and picked up the wrong shade (I'm really not surprised).  I was too tired to return it, so I just went with it.

This is what the back looks like.  Because of the design, I can't really tell that the thread is four different colors.


In anticipation of binding the quilt using the backing fabric, I left about an inch of extra backing fabric around the edges (I did have to trim a little before binding).  I then turned under the raw edges until I met the top fabric (about half an inch) and pulled that edge onto the top and machine stitched the binding to the quilt.  None of my layers shifted much so this was a fast and effective way to bind.  The only thing I would recommend when using this binding method is to use a continuous quilting method.  I started and stopped for each new row and you can see these points on the back.

Even though I didn't piece any part of this quilt top, I still really like it.  The top fabric design has quite a bit to look at and the quilting adds extra detail and brings attention to the design elements.  So I think this makes a great quilt even though I feel like I cheated by using complete pieces for the front and back.


The completed quilt measures 35 x 39.5 inches after washing.

This quilt will be donated as part of Project Night Night to a local homeless shelter.  This is part of my 2010 First Quarter Donation Project.

Thursday, March 18, 2010

a little free motion circling


This is my first attempt with free motion quilting.  I used my new (cheap) darning foot and practiced on some scrap before starting on this blanket (I'm having trouble deciding if it should be called a blanket or quilt because I didn't piece any part of it but I am quilting the layers together).  I admit that I don't have the patience for exhaustive testing.  I believe that you learn best from doing and you learn more from doing wrong. So I just jumped right into quilting the blanket and fiddled my way through a couple of rows.

I have seen pebble designs before as well as stippling techniques where important features were emphasizes in circles.  I thought it would be neat to try circling around each of the elephants in a continuous motion to tie all of the elephants together.  I circled each elephant about three times because I think it hides the crooked and uneven parts.  I think it also adds a modern and improvised look to a semi-structured technique.  I will just need to quilt more than I had originally planned so the layers don't shift in the wash; I think my circles don't take up as much space as I meant for them to.


It was actually going very well (and fast) until something happened with my needle and it embedded itself into the plastic on the darning foot.  I purchased my darning foot online for $7 which should have been a clue that there would be problems.  This darning foot has the needle hole completely surrounded with plastic.  I have seen other darning feet in tutorials that don't have this front piece of plastic, so of course I decided to remedy my problem by clipping off that tiny front part (the problem might also have been user error but that is always my last choice of solutions).  It was a bit of a chore to trim off that tiny plastic piece but I did manage to find the foot after it flew across the garage (I needed both hands to chomp down with the heavy-duty scissors).


I guess three broken needles in one night is my limit, so I quit for the night and will begin again today.  Patience is always renewed after a full night's rest . . . hopefully my machine feels the same way.


Saturday, March 13, 2010

fabric for donation quilts


I just wanted to post briefly about the fabric I picked up for two of the Project Night Night quilts that I will be making this month.  I decided to assemble four bags instead of two, each containing a blanket, an age-appropriate book, and a stuffed animal.  These bags are destined for a local homeless shelter to offer comfort to the children staying there.

I am pretty disappointed that I missed this section at JoAnn's when I was picking out fabric for Logan's quilt.  It's a small section labeled "Juvenile Prints" and there isn't much to it, but I found the two lovely prints in the middle along with a few robot and dinosaur prints.  Logan would have gone nuts over the dinosaur prints!  Oh well, I guess I will just have to make him a bed size quilt or pillow or something else with those.

I haven't quite nailed down the technique I will be using to put the quilts together.  But since these two will each contain two layers of cotton fabric with batting sandwiched in the middle, I think it's safe to call them quilts.  I will look for something a little quicker for the next two, but I have time to quilt these.

Friday, March 12, 2010

jimmi bags


I made these three bags for my mom and sisters.  I cut up some of my brother's t-shirts for the fabric.  It has been nearly three years since he passed, so I thought it might be nice to make something new out of his old clothes.  It just doesn't seem right to give away all of that stuff when I know we can turn it into useful keepsakes.

So here is my first go.  I chose very simple and quick bag designs because I wasn't super sure of my abilities (I didn't use any kind of pattern).  I call these Jimmi Bags for three reasons:
  1. my brother's name was Jimmy.
  2. these bags were nearly jimmy-rigged.  I used three different t-shirts and some scrap fabric that I had laying around.  I didn't do anything fancy--no interfacing, padding, or pockets.  They are only meant to be worn for short periods of time because there is no additional reinforcement.
  3. it's a cute name.
So I guess that any kind of bag thrown together with supplies on hand that offers memories of something or someone special can be called a Jimmi Bag.  The fact that I didn't spend all day sewing each of these bags shouldn't take away from the meaning of the project.  My mom and sisters will be able to carry a reminder of Jimmy around with them by making use of these bags as often as they like.

For all of these bags, I used cotton fabric for the lining.  I thought it would give the bag more structure than the stretch of jersey knit especially with no interfacing.

This rectangular design was the simplest.  I realized after it was complete that, because of the lack of reinforcement, the bag sagged wide open.  So I added some velcro to the top to hold everything inside.


This circular design was my first.  I think it's cute and I really like how the gathers turned out, but I wonder if the opening should be larger.  I'll have to get feedback from the user.


I like this triangular design, too.  It's a little bigger than I thought it would be (I was going for the tight shoulder bag look for all of them) so I made the strap a little longer.  This bag can probably hold an entire day's necessities while the others are probably only useful on short trips.  But I really like the combination of light grey and light blue.  It gave me an idea for a skirt . . .


This is definitely something I would try again.  I am also sure that I can come up with more useful keepsakes in his memory.

Wednesday, March 10, 2010

transformers birthday cake :: handmade


Yep.  This is the Transformers cake that Logan requested for his fourth birthday.  An exact replica of what he imagined and talked about for weeks extracted directly from his mind in detail onto this very cake.  No, probably not.  But this is my interpretation.

This idea might have worked out better on a larger sheet cake, but we only had three adults and two children (both belonging to me) at this party.  So I didn't want to go the sheet cake route this year because we always have so much left over that can't possibly be finished.  Plus, I prefer the look of a round cake; it's quaint. 

Duncan Hines to helped with the cake but the rest was all up to me.  I had white and chocolate frosting to top her off, but the hub got into the chocolate leaving me a mere two spoonsful.  So I decided to mix the small bit of chocolate with a good portion of white and, of course, I came out with a light grey.  That concoction makes up the ground in the scene.

For anyone Transformer-challenged, I have included this photo to set the scene for you.


Did this turn out as well in real-life as I spent weeks creating in my head?  Not so much.  But sometimes things work that way.  And I can stamp it with the "handmade by mom" seal and I guarantee it's the only one of its kind.  The effort is what really seemed to matter . . . well, and the removable, playable abundance of Transformers figurines.  A take away always helps.  Logan told me the next morning, "Mom, I'm so proud of you for making my Transformers cake."  Definitely worth the effort.


Happy 4th Birthday Buddy!

Sunday, March 7, 2010

old-time roadster quilt :: complete


I finished Logan's birthday quilt last night and I've decided that I love it.  I would have done a few things differently with the placement of the car fabric, but I guess that would defeat the attempt at "randomness" (the lack of symmetry bugs me a little, but I'm getting over it).  So, despite the repetition of a couple of pieces, I've decided to love it.

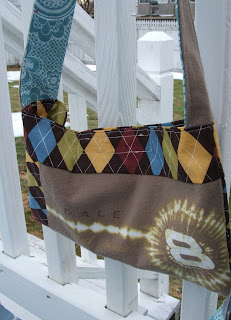
Here is the back.  I had plenty of brown minkee laying around and wanted to try it out on something bigger than the messenger bag strap.  It's super soft and I think it makes a good quilt back by adding texture.  But, of course, I couldn't just go with a solid brown back. 


And can you tell what this is?  (It's not a cat.)


How about if I turn it like this?  I had a long blank rectangle that was screaming for embellishment.


Once again, I had quite the dilemma when trying to decide how to quilt it.  I still haven't had the time to work out the use of my darning foot.  But in honor of the geometric shapes that fill in the gaps between roadsters, I simply quilted lines at random angles.  It looks a little messy in this photo, but I like it real-life.


I really wanted to bind the quilt with the same green that I used for the sashing.  That color really grew on me.  But I only bought a quarter yard and ran out well before I had to bind the quilt.  So I was stuck with red, but I did manage to squeeze in a strip of blue and a strip of green on the sides.  I'm surprised that I like it. 


But the biggest surprise of all . . .

 I hand sewed the binding to the back!! 

Yes, I really did it.  I can't believe it either.  I thought that if I was ever going to try to hand sew the binding that this was the quilt to try it with.  It is a lot smaller than a normal lap quilt so if I hated it, I wouldn't have to endure the torture for long.  But I secretly enjoyed it.  It was kind of relaxing and very satisfying.  Hand sewing the back is so much neater.


I really hope the little man enjoys it as much as I do.  I have visions of him requesting this blankie over his absolute-favorite-since-he-was-born blankie that a friend's mom crocheted for him.  But that's asking a lot, so I will settle for a excited squeal and a hug when he opens it.

Tuesday, March 2, 2010

donation project idea


I am always looking for different ways to volunteer.  In my experience, volunteering is always rewarding but even more so when you are doing something you love.

So when I received a flyer in the mail from my church asking for donations of stuffed animals, books, and blankets (they can be handmade!), I was totally in.  I have been looking for a way to make volunteer work a regular part of our lives, something more than just the occasional bake sale or random monetary donation. 

I participate in two walks for different causes each year, but other than those we really don't have a cause that speaks to us more than any other.  So in order to explore different causes that can use the kind of help that we can offer, we are implementing a

"Donation Project of the Quarter."

Choosing a cause each quarter will ensure that we keep others' needs in mind throughout the year.
In order to make this idea official, I created this board to display our chosen donation project and hung it in my craft area.


This quarter's project is Project Night Night.  I will pick up two bags from my church and fill each with a stuffed animal, a book, and a (handmade) blanket.  The bags will be donated to children at a local homeless shelter to offer comfort during their difficult time.  For this project I recruited my sister, Laura, to help fill the bags.  While I'm busy constructing the blankets, she will choose the books (one of her favorite pastimes) and the stuffed animals.

We have until the end of March to hand over our donations so please stay tuned for the results.  I am very excited about this donation project because I get to do something I truely enjoy that will help comfort two small children.