Tuesday, December 27, 2011

a new hobby {and a cozy for the tools}

I've been crocheting . . . a lot.  I got it in my head one day to learn to crochet so I could make a hat.  It's always fun to me to learn something new, but I wasn't sure how it would go.  I taught myself to knit (but not purl) a couple of years ago, and it was fine.  That pretty much means that if knitting was the only way to pass time, I could tolerate it but it certainly wouldn't be my first choice of crafts.

But for some reason, crochet was different for me.  I first made a hat for my 5-year-old that was too big.  After reworking it, it fits now but there is nothing special about it.  I hijacked it back so I improve it even more.  The second hat I made was for my 3-year-old who doesn't appreciate handmade items as much.  But this hat is so cute.  I just can't figure out how to get the photos off my phone.

I have made several other hats that I will share soon, but I first wanted to share the case I made to carry my crochet hooks and knitting needles.  Most of these hooks and needles were extras that my mom gave to me.  I have since purchases a few hooks on sale of sizes that I didn't have.


It rolls up nicely for easy transport.


The only thing I would do differently (and I will have a chance because my mom requested one) is to add some kind of flap so the needles stay in when help upside down.  I try not to carry it upside down, but when I'm in a hurry I can't tell the difference.


Now I just have to remember to put my hooks back in here when I'm done with them.

Monday, December 26, 2011

a lone sock monkey

The monkeys I made for a friend's mission in Israel turned out super cute!  Unfortunately, the amazing photos that the hub took of them hanging in trees and sitting on top of fences before he shipped them were lost forever when my 5-year-old pressed the 'delete all' button on the camera.  Even the are-you-sure-you-want-to-delete-all-photos warning didn't stop him.  So I don't have any photos of my hard work.

But when a friend saw what I was doing, she asked me to make one for her daughter for Christmas.  I almost ran out of time, so I had to settle with these knee high, brown and creme striped socks from Walmart.  I was looking for something a little more colorful (it's not often I get to sew for girls), but I think this monkey looks a little more like a traditional sock monkey with these colors.


I used this tutorial for all the monkeys I made.  I just make the ears a little bigger.


For Pepper here, I gave her yarn eyes in the shape of an X.  I used buttons for the eyes on the other ones I made.  I also thought she could use a modern scarf/cowl to girl her up a little, so I wrapped some extra yarn around loosely around her neck.

Sunday, November 6, 2011

donation project for kids


For the last couple of hours I've been working on cutting up socks to make sock monkeys for a donation projects.  A friend is collecting sock monkeys for kids where she does mission work in Tel Aviv, Israel.

I'm using this tutorial to make the monkeys.  (There is also a tutorial for making an adorable sock cow!)  I've cut and sewn all the pieces to make 5 monkeys.  Later during the Sunday night shows, I will stuff all the pieces and sew the monkey parts together.  If I play my cards right, the hub just might help me stuff.

Friday, November 4, 2011

home sweet home {a wall quilt}


I finished the top for this wall hanging about 9 months ago.  I had a spot in mind for it when we made the offer on new house, and now it's finally done!  The spot in my house at the end of the hallway between the boys' bedrooms doesn't get much sun so I took these photos outside.


I used part of a Central Park charm pack for the squares and the trees and scraps of fabric for the house.  I like the cheerfulness of all the colors.


I decided to quilt it using a meandering flower pattern.  Considering this may be my fourth time free-motion quilting, this one is a success and I will be using this pattern again.  I had to doodle the flowers on paper first so I could get the right idea and it took a few tries.  But once I transferred the idea to the quilt, it went really smoothly.  I spent 2 hours quilting the entire thing on my regular old machine.


I just love this binding.  I think it's from the Punctuation line.  I colors are great and the stripes are just the right size.  I love having a stripey binding that appears to wrap around the edges of the quilt.


Now I just need to add a way to hang it and I will have something lovely to look at when I wake up the boys in the morning . . . besides them of course.


This wall hanging measures 45-1/2 by 26 inches.

Thursday, November 3, 2011

my first silky knit shirt


I found this fabric in the bargin bin.  It was very close to what I had in mind for a new shirt, so I got pretty lucky.  I wanted to make shirt that would be good for work and play but I wanted it to be quick and easy.  That's exactly how this went.  There are no sleeves!  I just cut the top and back kimono style so it would look like there are sleeves to the untrained eye.

I cut the top and back in exactly the same dimensions.  Usually the neck of the front piece is cut a little lower than the back or the arm holes are cut a little different, but remember I was going for easy.  So I couldn't spend the time to figure out the differences.


After the pieces were cut, I serged the sides together and hemmed the neck and sleeves.  I also chose to add a thick band at the bottom so it wouldn't be too simple.  I'm not sure this was really necessary because the shirt isn't that wide to begin with.  I usually see the band fit snugly on the hips while the rest of the shirt flows more roomily around the waist.  This shirt didn't have as much extra room around the waist, so the band really wasn't necessary but I like it.  It's kind of slimming.

And there you have it.  The simplest shirt I've ever made!  And there will be more.

Monday, October 31, 2011

happy halloween from . . .

The Super Mario Brothers!


Even if Mario is pouting on the hill.  But soon he decided to participate in the camera shoot . . .


And add a little spunk to his character.


I made both of the boys hats.  I viewed a couple of newsboy hat tutorials online, but I had to come up with my own pattern because I couldn't find one with dimensions.  Mario's hat looks like more of a baseball cap.  I altered the dimensions of Luigi's hat, maybe a little too much, to give it more of a mushroom shape at the top.  I think the right look is somewhere between the two.

I also painted the M and L on the hats with fabric paint.  This was a great opportunity to use the freezer paper I bought a year ago.  I just cut out the circle and the letters and ironed them on the hat.  Then I painted with white fabric paint and viola!  A perfect letter inside a perfect circle!


I also had to make Luigi's pants.  It turns out size 5 overalls aren't in style right now.  With no luck finding a pattern, I was on my own.  I used a pants pattern and just added the top.  These took me at least 10 hours; I'm glad to be done.  I think they turned out pretty well and they fit (barely).  What more can you really ask for?


Have a candy filled holiday!

Sunday, October 30, 2011

binding . . . and a few other things on my list


This is the binding that I'm adding to a new wall hanging quilt.  I just love to see binding rolled up like this.  It's too bad you can't just purchase it like this.  That sure would save a lot of time.

It's almost 11am and it's still foggy outside.  It snowed yesterday.  So I'm planning to spend another day inside sewing (for as long as the boys can keep themselves busy).  Here is my list of things I would like to get done today:
  • attach this binding
  • baste another baby sized quilt
  • start and finish a couple of snack rugs for the kids (these are like mug rugs but for snacks since I don't enjoy watching the boys maneuver ceramic mugs)
Not a particularly ambitious list but hopefully doable today.  I hope there are some fun things on your list today!

Sunday, October 9, 2011

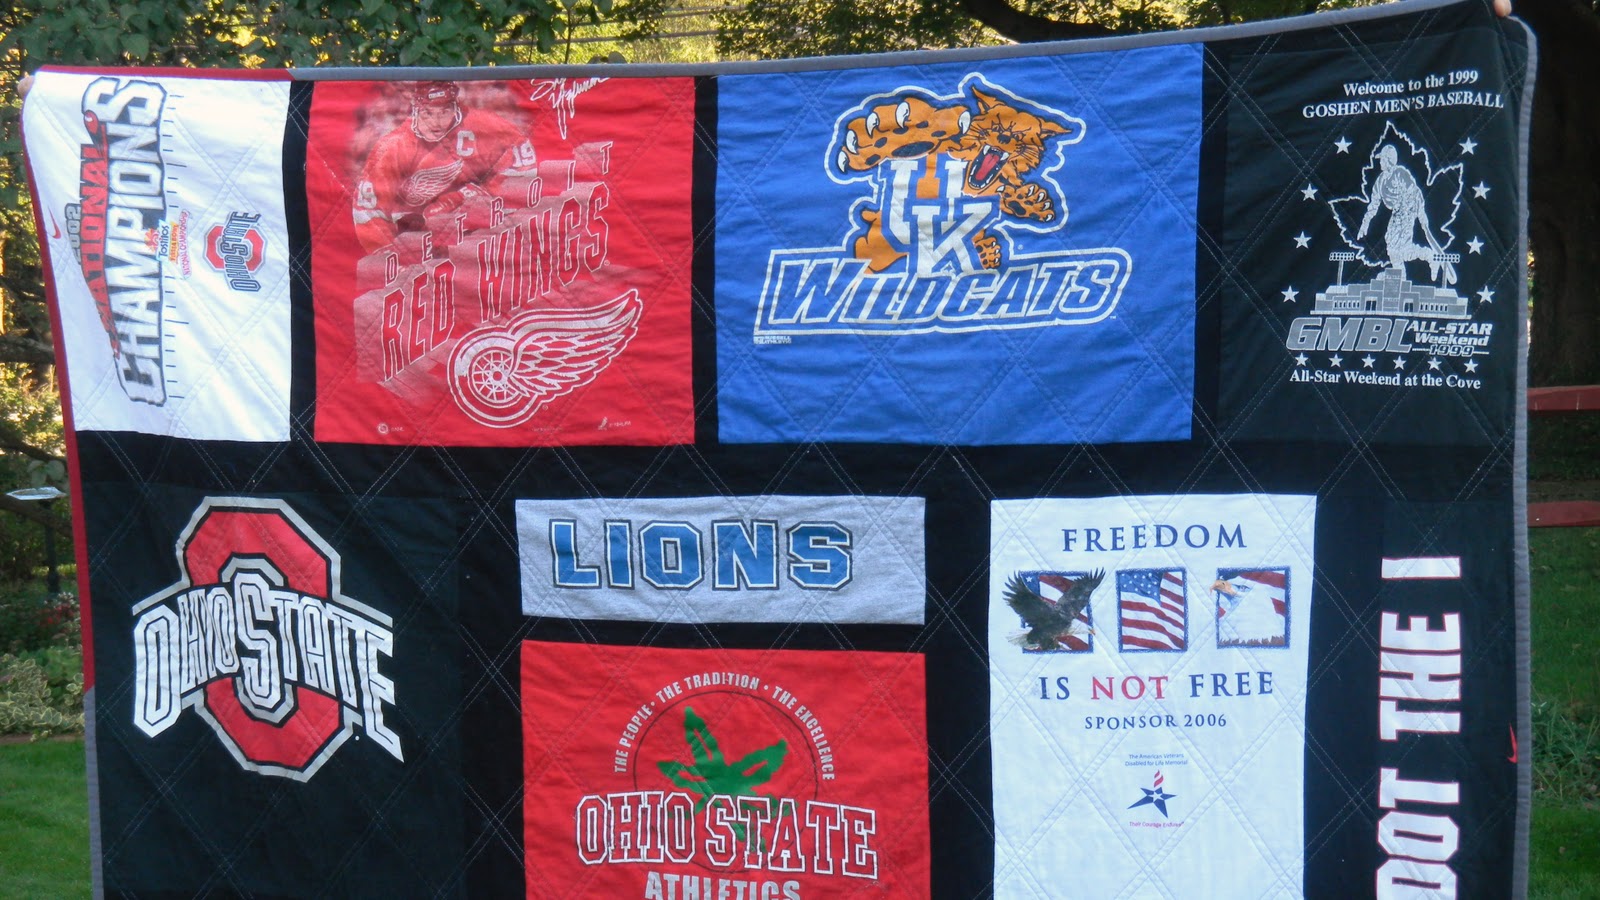
t-shirt quilt for the hub {complete . . . finally}


I finished the top for this quilt more than 8 months ago.  I even basted the layers together, but then it just sat in a neatly folded pile for 8 months until I got around to quilting it.  Sad, just sad.  (But what's even sadder is that I have a small wall hanging that might break that record.)

This was a project for the hub.  I rarely get to make anything for him because he is, well, a man.  I have plenty of experience sewing for little boys, but grown up boys are altogether different.  It's hard to find cool quilting cotton for a man and solids just aren't that fun.  So a t-shirt quilt is a perfect gift and he requested it so I just had to do it.  With a project like this, most of the fabric is provided by him, so it will fit his personality just right.


This quilt was supposed to be his birthday gift this year.  Since his birthday was back in January, I guess I missed that deadline, but I am happy to say that I finished it up just in time for cooler weather.  And since I backed with a flannel bed sheet and put a layer of cotton batting in the middle, this sucker should keep him plenty warm this winter.


I cut the t-shirts all different sizes, so it was a bit of a challenge to get the layout to work.  I used a black solid for the sashing to separate the t-shirts.  I did not use interfacing on the backs of the t-shirts.

I quilted this in grey thread using double diagonal lines to make diamond shapes.  I actually used painters tape to help guide my straight lines.  I'm sure others have done this, but this also served an additional purpose.  The tape kept the knit t-shirts in place while I quilted (even with the walking foot, the shirts shifted), so I didn't really need the interfacing.


You will never find two t-shirt quilts exactly the same.  I think they always turn out a little quirky because the designs and colors aren't always complementary.  But I guess it's that kind of originality that makes them such a hit.  And it's a great way to preserve old or outdated t-shirts that you just can't bare to part with.

Monday, October 3, 2011

2x2 patchwork pillow {with piping}


I finished this pillow over the weekend.  I used 100-2x2 inch squares in a grid pattern, the largest number of the smallest squares I've ever sewn.  I almost changed the design so many times during the process because I'm always looking for that extra angle that will make something look really amazing.  The problem is that my original design may have been really great and I just don't give myself the chance to find out.  So for this one, I decided to forgo all changes and just go with my original thoughts.  Does anyone else drive themselves crazy trying to find the perfect design?

This was my first adventure with piping and I certainly learned a few things.  I'm documenting them here because I know I will forget next time.
  1. When covering the cord with fabric, don't sew as close to the cord as possible.  Leave a little room between the cord and the stitching.  You can sew close to the cord when you sew the layers together.  This will prevent the original stitching from sewing when the layers are sewn together.
  2. I sewed the piping to the top layer first and then added the back layer.  When sewing the back layer, follow the same stitching line created when the piping was sewn to the top layer.  This will ensure the top layer stitching line doesn't show between the piping and the new seam line.


I backed the pillow with light blue minkee that I've had for a couple of years.  I don't even remember what I originally used it for.  It's super soft, but I forgot how much it moves during sewing.  I lined each the front and back pieces with muslin, so I guess it could have been the muslin sliding smoothly against the minkee.


I even added a carry strap for little hands to drag the pillow around.  We do a lot of shifting rooms at my house to keep things interesting, so it was important to be able to easily carry the pillow around.


The pillow form is one of two down pillows that I bought at a white elephant sale more than a year ago (2 for $1).  Since this is down, it doesn't stand upright as well as other pillows, but man is it comfortable.  I designed this pillow for Logan, but I find the hub sneaking rest with it more often.


I actually prefer the wrinkled look of quilts, but I had a really hard time deciding whether I should wash this pillow cover.  I included an invisible zipper (great tutorial here) for easy removal, but I was afraid I would affect the look of the pillow.  Since the pillow was created for little boys, I'm sure I will have to wash it soon anyway.

Friday, September 30, 2011

not much to show . . .


So . . . I've been gone quite a long time.  There's a lot to do when you move into a new house, and I guess summer is filled with it's own fun activities so it's hard to keep up with hobbies.  And when your new house is 20 degrees hotter upstairs than downstairs, your new sewing room doesn't look so enticing.

I just counted up my project starts the other day and I have at least 10.  Yep, I have officially exceeded single digits.  I guess I've had trouble focusing lately.  But that also means that I should have plenty to post about very soon.  The cooler weather and shorter days help boost the productivity.

I thought a would share just a bit of this project. This small scale project took 100 2.5-inch squares.  I love how these colors work together: light blues, oranges, and yellows.  The combination looks fresh and modern but still boyish enough to pass on to my little guys.

I hope to finish up this project this weekend so stay tuned . . .