Sunday, October 31, 2010

happy halloween 2010!

From my family to yours . . .


Have a bountiful Halloween!

Wednesday, October 27, 2010

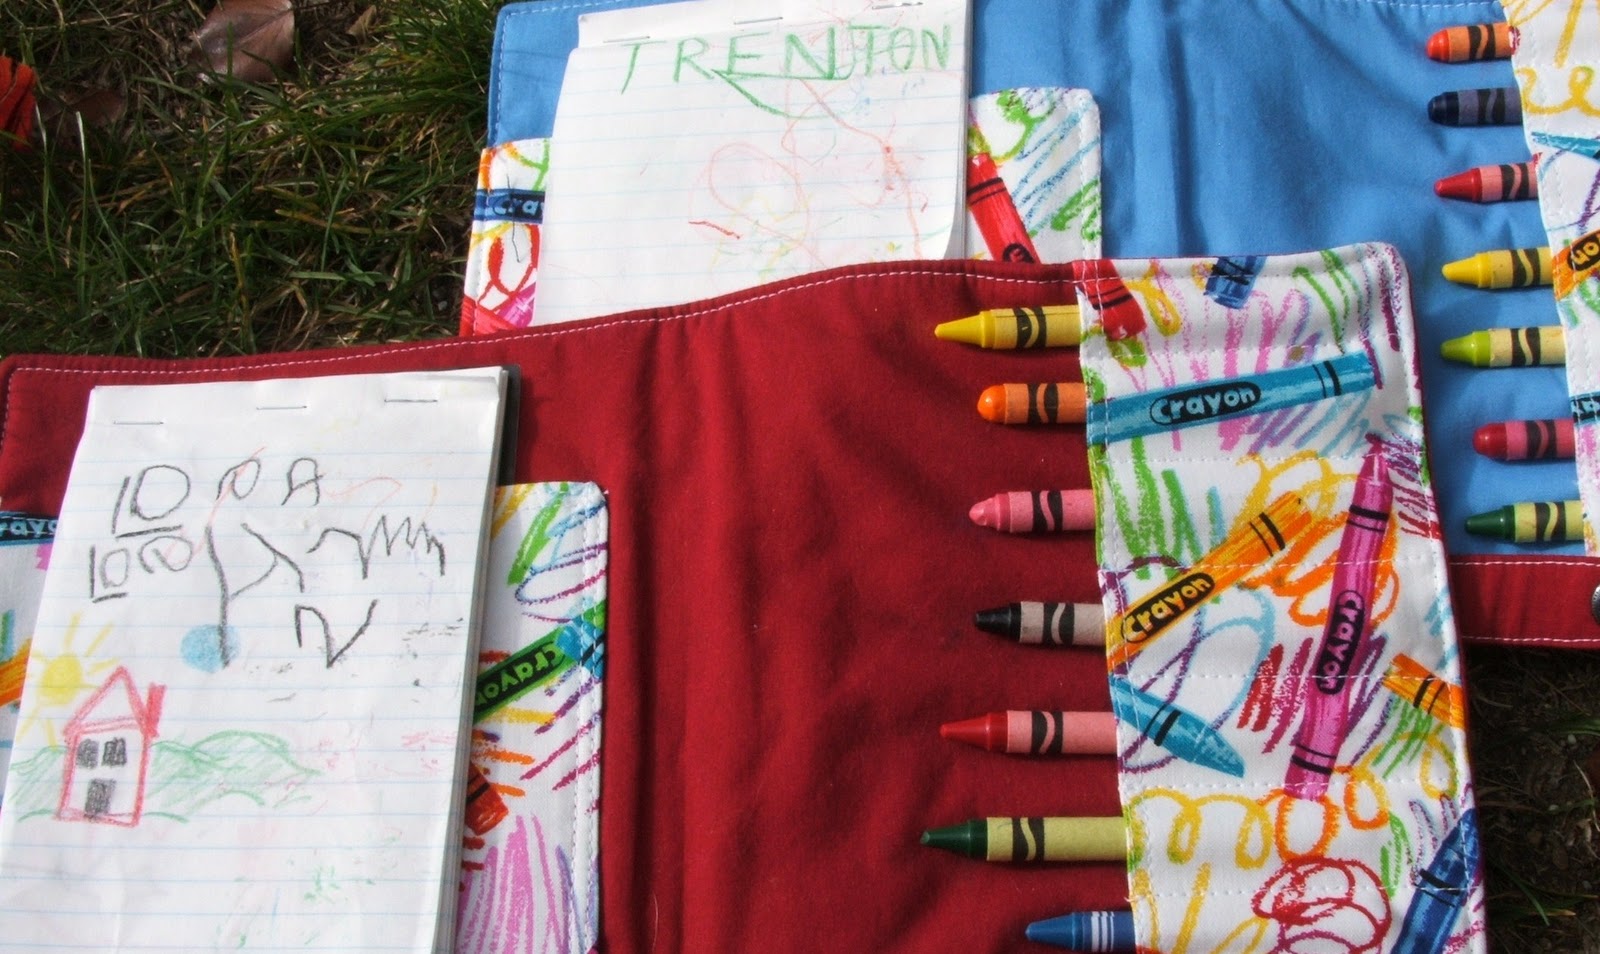
crayon & pad folder

Last weekend, Logan said to me those words I have been longing to hear for 4.6 years:

"Mom, I wanna make something."

This is the time when you realize that your passions have made an impression on your little ones. 
He is actually interested in the things that interest you.
He wants to be part of that part of your life.
He has the urge to create!  What a wonderful thing to pass along to a child.


Anyway, when I questioned what he wanted to make, he replied that he didn't know but that he wanted to make it with fabric (to be specific, he said he wanted to make something with "fagric" but I got the point).  So the wheels started turning and we came up with a crayon and paper pad folder.


Last Christmas, my mom let me go through her fabric stash and take whatever I wanted.  She had this Crayola crayon fabric for probably 10 years and she used it once with plenty left over.  So I took it figuring I would find some use for it.


I have always wanted to make a crayon roll-up for the kids, but I never found the time.  I like the idea of all-in-ones, so I chose to make it a folder condusive to storing a pad of paper, too.  I was too lazy to go to the store and get a real pad of paper, so I trimmed up some paper from my ridiculously huge paper stash and stapled a stack to a piece of cardstock for stability.

I gave the folder more substance with a piece of quilt batting.  I might also stablize the main pieces with interfacing next time to make the folder even more substansial.  I topped off the folder with a strap and snap, but I forgot how little hands can't handle snaps very well.  Velcro would have been a better choice.


This little project got rave reviews from the recipients.  We even made a second one for the little brother.  Logan is so proud!  He asked if he could bring his to preschool to show all his teachers.

Sunday, October 24, 2010

ghostly halloween bucket


My two-year-old needed a trick-or-treat bucket for halloween this year.  He wasn't really into halloween last year so there was really no need for a bag.  But this year I think I have convinced him that costumes really are fun . . . especially when you get candy just for wearing them.


It's almost as big as he is, so it should fit lots and lots of candy . . . or chips since that's what the zoo was giving out this year.


My four-year-old has a pumpkin bucket that has been with him for 5 halloweens.  It's still in good shape.  I picked a bucket design that would compliment his pumpkin.  If only my four-year-old would let me be as creative with his costumes as I'm allowed to be with the buckets . . .

This pumpkin bucket was purchase before I discovered my true love for sewing.

Tuesday, October 19, 2010

a new (oversized) patchwork pillow


I finally got to make this pillow as a wedding gift for the hub's sister.  Her wedding was a couple of weeks ago, but I got tied up with the boys' suits and my dress so the pillow had to wait.

It's an oversized pillow, about 19 inches by 37 inches.  Not a body pillow, persay, but close.  I chopped a little off the long edge of the pillow form so the pillow would appear more stuffed.  I like overstuffed pillows.  I also like the look of subtle quilting on a pillow, so I sandwiched a piece of batting between the patchwork top and the lining and quilted a few simple blue lines.  If you want more inspiration for quilted pillows, SewKatieDid has some amazing photos here.  That's where I found my inspiration.


I really like this fabric that I used for the backing (good thing I kept some for myself).  There's nothing like birds and leaves and whimsical tree branches to shout "wedding day" don't you think?


And finally!!!  An invisible zipper that is actually invisible!  If it weren't for the zipper pull, I would bet that no one would even notice.  I've read tutorials on inserting invisible zippers that say to iron the zipper.  But I didn't realize until this project that I had to iron the teeth toward the front of the zipper to allow the zipper foot to get deathly close to the teeth.  Duh.


I added a little personalization to the pillow via applique.  Hopefully you would assume this is their wedding date.  You would be correct.  A personal touch, but to be honest, I should have gone with smaller buttons.  I think the large buttons, although lovely in their own rite, overshadow the numbers.  But at least all the colors match.


Happy Wedding Day Angela & Mike!  The ceremony was lovely and the reception was a blast.  I wish you a very happy life together.

Wednesday, October 13, 2010

quick zipper pouches


After my last few projects (that I absolutely loved making but required a major time investment), I wanted to make something quick.  I have plenty of scraps and remnants laying around (as I'm sure we all do) and they work perfectly for small projects like this.  I only had 6 inch zippers on hand so these pouches measure about 4 inches x 6 inches.


I used my invisible zipper foot for the first pouch (the greyish one).  I guess I've gotten a little too good with that foot because I sewed just a little too close to the teeth.  I didn't sew over the teeth, but the zipper is a little hard to open because it runs over the fabric just a wee bit.  Not too big of a deal, but I decided to use a regular zipper foot for the next pouch (I forgot I had a regular zipper foot).


I don't know what I will use these for, but I know that over the last several months I have thought to myself many, many times "I should make a pouch to carry those."  If that thought crossed my mind that often, I'm sure these will be put to good use.  And if not, I have a jump start on Christmas presents.

Saturday, October 2, 2010

i made my first dress


In addition to the boys' suits, I also made myself a little something for the hub's sister's wedding.  I thought a fancy dress was in order since the hub and both little ones would be dressed to impress.  By the time I was done with the boys' suits, I only had 3 evenings to make my whole dress.

I bought a pattern to use, but I wasn't paying attention when I pulled it from the drawer.  I bought the larger sized pattern and by the time I realized it, I didn't have the time to exchange it.  So I decided to try one on my own.  A risky bet for first dress.

I used champagne colored shantang for the fabric.  I made the top part first by cutting rectangles and pleating them.  I stacked the pleats at the top so the overall shape would form two triangles.  Then I attached the two triangular shapes at the top so they would form a neck strap for a halter top look.

Not so symmetrical here with the pleats at the neck, but it worked well enough.


I included a center sash just below the bustline.  This is really the only part that made me nervous.  I knew that if the sizing was off even a little that the dress would either be too tight or too loose.  During the process, I was sure that I had gone too small (a much harder problem to fix and a predicament I often find myself in for some reason).  But when I tried it on, it zipped better than I even expected it to!  It's for those seldom moments that I even bother sewing clothes.


My not-so-invisible zipper . . . and a fun tag chosen by my 4-year-old.


I also opted for a "blind" hem.  Why is it that my invisible zippers aren't invisible and my blind hems aren't blind?  Probably lack of practice . . . and matching thread.


This is the back.  Too low for a bra, so I had to go without.  It wasn't totally unexpected given the design I chose.


Overall, I am extremely happy with the result.  The dress is completely lined, too, which again was a first for me.  And it only cost about $40.  I really hope I can find another occasion to wear this dress.  It looks great with a black cardigan, too (thanks to my sister).  Some parts of it may look homesewn, but I think it's a pretty great accomplishment.  And it makes me want to sew more.

Monday, September 27, 2010

suits to bear rings


For the past two weeks, I've been working on these suits for two handsome gentlemen.  The hub's sister was married this past weekend and both my boys were asked to be ring bearers.  Suits (and especially tuxedos) for rent are very expensive and you don't even get to keep them.  So I decided to make each boy the appropriate attire.

I started with the vests.  I used Simplicity 7030 and cut the size 4 for my 4-year-old.  I've cut size 4 pants for him and they were always too big, so I figured a size 4 vest would work well.  I was wrong.  I even added 1 inch to the length, but the vest was still too small for my liking.  Luckily I had a smaller client that could fit right into it.  So for my 4-year-old, I added a half inch total to the width and 3 or 4 inches to the length.  Nearly perfect!  The vest overlapped the top of his pants which was a perfect length . . . but I probably didn't need to add width.


The black pants were refashioned from adult-sized pants.  I used this tutorial from This Mama Makes Stuff, but I didn't do the skinny part.  Well, I didn't mean to do the skinny part.  I used a size 4 pattern for the bigger pants.  I even slimmed it down a little but they still ended up too big.  I used some 2T pants as my pattern for the little guy's pants, but I slimmed them down a little too much.  They fit, but I could I tell they looked a little "skinny."  But since that look is back (sigh), I could get away with it.  I guess I will just have to get better at using ready-made clothes as patterns.

The bow tie is my favorite.  I used this tutorial from Make It and Love It to refashion a men's necktie into a bow tie.  Only I used 1 adult tie to make two smaller kids' ties.  I love them!  I think a bow tie was the right way to go.  Fun, yet still serious.

All in all, I think it was definitely worth the two weeks of work that I put into these suits.  I don't know what I will do with the vests, but the pants and perhaps the bow ties can be used again.  And I learned quite a bit through this process, and that's what it's all about for me.  Well that, and being able to show off my two little bugs in great handmade, one(or two)-of-a-kind clothes.


I purchased the white shirts.
I apologize for the terrible photo quality.  Everything happened so quickly that I didn't have time to have the boys pose outside for blog-worthy photos.  Lesson learned.

Tuesday, September 7, 2010

a handmade lunch bag {for the first-time preschooler)


My four-and-a-half-year-old will be attending preschool for the first time this week.  I'm not worried about him at all.  He is mr. social and feeds off interaction with other kids.  We enrolled him in a preschool for two , four-hour days a week and he has to bring a lunch.  After clarifying that peanut butter is an acceptable food this year as no child enrolled has a peanut allergy (whew...he'd rather starve than eat turkey, ham, or bolonga), the hub and I got to talking about backpacks and lunch boxes.  I fully intended to buy him a lunch box but the hub suggested to Logan that I make one.  Nothing beats a hub-prompted project because I get to spend all kinds of time working on it with no questions about what I'm up to.

A few days later, Logan and I set out for the fabric store in search of fabric with school buses (his choice).  After what seemed like hours to him (but was in fact about 4 minutes) to no avail, we (I) came across this fabric.  It's so colorful.  I love it!!  I was afraid it was too girly but gave him the choice.  He loved it.  Yes!  I knew it would make a cute lunch bag and I began pondering what to do with the rest of the yard.
Of course, there are a bunch of ways that I could have made this.  A very simple rectangular bag with a velcro closure would have been a quick way to go.  But I am neither simple nor quick, so I chose just about the toughest design I could think of.  I used a very thick stablizer as interfacing to give the bag extra support.  This extra thickness definitely made the bag much harder to handle.  I used a similar design for this overnight/gym bag and it wasn't nearly as difficult to put together (although I've learned a little about stablizing bags since that project).


And, by request, I added a pocket for I'm not sure what.  Napkins?  Bugs maybe?  The client requested it so I delievered.

For the lining, I was going to go with cotton.  But then I ran across a placemat that we bought for Logan a few years ago.  It never really gets used, so I decided to repurpose it.  It's made of a fabric that wipes cleaner than cotton ever would.  I also decided to use it for the bottom since I know that might get pretty dirty (and because I couldn't decide which way the bottom fabric should face).


I hope the opening doesn't end up too small.  I only had 7 inch zippers.  I added a little extra fabric to the end of each zipper to make the bag longer, but the opening barely fits a mini bag of chips.  I shouldn't have a problem getting the food in there, but it might be a task to get it out . . . especially for a little boy who will probably only eat what he can easily pull from the bag like fruit snacks and a juice box.  Logan picked out the green zipper to match the fabric, so at the very least, the zipper looks fabulous.

I also equipped the lunch bag with a removable strap.  I originally had no other reason to do this other than my desire to use my new snaps.  But then I started thinking about where to put his name on the bag.  Writing directly on the fabric is not an option (way too much work went into that thing to deface it with permanent marker), but I'm okay with writing on the strap.  Plus, if the bag holds up long enough for my next son (or me) to reuse it, I can just change the strap with a new name.  Sometimes I shock myself with my genius ideas.


So here we are . . . the first day of preschool with the new lunch bag.  If nothing else, it comforts me to know that he has a part of me with him on his new venture (and that no one else will have the same lunch bag).  Have a great time, little man!  I know you will.

Sunday, September 5, 2010

a new (super simple) knit shirt


One of my goals at the beginning of the summer was to make myself a couple of knit shirts.  After my last in-store purchase, I decided that I don't like buying knit shirts from the store for 2 reasons:
  • I don't like spending more than $15 for a shirt and that can't buy me high quality goods.  They wear out too fast.  I have a few clothing staples that I have had for 10-15 years (they cost me much more than $15 back then but I was single and childless and had no better reason on which to spend).  I wish $15 could buy me that.
  • I can't stand being the same as someone else.  It drives me crazy to see someone else wearing my shirt (yes, even if I don't have it on).  So really the only way for me to even have a shot at 100% uniqueness is to design and create my own.
So this shirt is my first shot at a real knit shirt.  Well, I guess I shouldn't call it real shirt because it was ridiculously simple.  Fashion designers would laugh at the simplicity but busy moms will delight in it.  No need for full blown tutorial when there are only 4 steps:
  1. Cut out two pieces of the fabric using the back of another shirt as a pattern.  Build the straps into the pattern.
  2. Cut out the desired neckline from the front piece.  I chose a v-neck for this one.
  3. Serge the sides of the front and back pieces together up to the sleeve holes.
  4. Try on and tie the straps.
I told you it was simple.  I didn't even hem the bottom or sew the "sleeves" or neckline.  This light knit rolls well and I like that look.  Although if I had the patience, I could have sewn around the neckline for a cleaner look.  And I can't believe how well I did matching these stripes on the sides!  I've been waiting for that talent to arrive.


So here I have my first summer knit shirt built completely from scratch just in time for summer fall.  And although it's a little casual, with the right cardigan, it will make a great addition to my desparately-needs-upgrading wardrobe for the new job.

Tuesday, August 3, 2010

yee-haw! pj pants

So this is about all I've had time for lately.  We have another couple of months of chaos with the move, but I'm hoping we will settle into some type of normalcy before that.


I made these last weekend while awaiting the arrival of the hub and kids here in Pa.  I picked up this flannel cowboy fabric in the remnant bucket at JoAnn's a while ago.  It's not my favorite and the red on the cowboy hats bled into the white fabric, but I don't think you really can go wrong with $2 pajama pants handmade by mom.


Of course, the kid loved them.  And I tacked on these knee pads for extra-special flair!  I used red jersey knit from an old t-shirt.  I first sewed the pads in place with a regular foot (but a walking foot would be way more helpful here) and then I used my darning foot to sew the (semi)horizontal lines.  Just the idea of all that stopping and turning put me to sleep, so I used the darning foot to free-motion the lines.  The lines aren't as straight and even, but the process was a lot quicker.  And I kind of like the look of the improv, wonky lines.


Another need filled using mom's skills.  But I think that I should consider investing in higher quality fabric . . . maybe when the kids get older and start to actually care.