Showing posts with label books. Show all posts

Sunday, April 24, 2011

chic & simple jacket


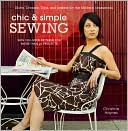
I tackled a pattern came from this book by Christine Haynes for a birthday gift for my sister.

Chic & Simple Sewing by Christine Haynes: Book Cover

This book contains some really great patterns.  Most of the designs do not have fitted elements so this book would be good for beginners, too, but be warned that the instructions have very few illustrations.  Many of the designs have a rectangular body and use a tie around the waste to "fit" the garment.  And I have never seen so many hip and modern designs in one book.  Just about every one of these designs is on my to-do list.


A few things I really like about this jacket:
  1. The raglan sleeves.  I have mentioned before that I love raglan sleeves, particularly on little boys.  I don't get much a chance to add them on my own clothing, so this was a nice change.  And I love how much easier they are to sew on than a set in sleeve.
  2. The sleeve length.  The photo in the book shows these sleeves a little longer.  I think it's because the jacket in the book uses a cotton fabric without a lining and turns the sleeve hem under 1/4 inch twice.  I used a different seam allowance, so my sleeves turned out a little shorter.  But I do like 3/4 length sleeves for springwear.
  3. The jacket length.  I am picky about my jackets being just the right length.  I think this length is pretty good.
  4. The bias tape. I used a neat bluish-green fabric with different colored dots. I love this fabric. I also (surprisingly) did a pretty good job attaching the bias tape.
  5. The gray cordoroy.  I just love cordoroy.  Especially gray.
  6. The tie.  It's a fun element.


I added a lining to the jacket.  The pattern in the book does not have a lining.  I wanted my jacket to have more weight, so I added a lining.  My original intention was to use the bias fabric for the lining, but my brain must have been taking a break when I bought the fabric because I only bought 1 yard.  So I had enough to line the sleeves and that was it.  I bought 3 yards of cordoroy and that was enough for outside and front and back parts of the lining.


I think it's a little inconvenient to have a tie without a way to keep it in place if you have to untie it.  So I added belt loops to each side.


Some things I would change next time:
  1. The sleeve pattern.  There isn't enough ease in the armpit.  This jacket is intended to be worn in the fall probably over a very light, fitted shirt.  In that case, the ease is okay.  But I would add a little extra room in the pit so I can comfortably wear the jacket over thicker shirts, too.
  2. I wish the jacket was a little more fitted.  I will have to research the few other patterns in the book that are a little more fitted to see if I can adapt this pattern a little.
Too bad this jacket isn't for me.  But this project was quick enough that I should be able to whip up another in no time.  I'll be on the look out for a great fabric!


Tuesday, June 29, 2010

a striped yoga bag


I've been a little out of pocket these days, but I just wanted to post this yoga bag that I made for my sister.  I used the measurements and instructions from the One Yard Wonders book put together by Rebecca Yaker and Patricia Hoskins.  This particular project was submitted by Gene Pittman.

My sister picked out the fabric.  It was a good experience going to the fabric store with her because I got to learn more about her taste.  I would never have picked out this color combination for her, so I'm glad she chose her own.  I really like the fabric; I just didn't think that she would.

Hopefully my sister finds the pocket useful. I followed the instructions for the pocket, but I'm not sure how practical it will be. I'm all for extra storage, but I thought the pocket should be more robust to hold bulky keys or something. But I didn't want to take the extra time to figure that part out (it was late).


I didn't follow the instructions for the bag handle from the book.  The project in the book uses a strap attached near the top opening.  I wanted a strap on the side so it could be easily carried over the shoulder.  I used webbing for the strap which saved me a lot of time (as opposed to using the bag fabric for the strap).


Oh, and since this is my review of the project, I would like to point out two things:
  1. One of the items needed is 22 inches of elastic.  For the life of me, I can't figure out why you would need that much elastic for the opening.  I wanted my opening to be rather small, so I used 5 or 6 inches of elastic.
  2. I don't agree with the verbage of one of the measurements.  The project says to cut two 16.5 inch diameter circles (one for the outside and one for the lining).  This is not meant to be the diameter of the circle.  This measurement would be the circumference of the circle.  Maybe this is how pattern instructions are written when dealing with cutting circles, but I almost ended up cutting a circle three times larger than I needed it (again, it was late).  For anyone interested, the diameter of the circle needed is 5.25 inches.  Yes, I am a math geek.

Saturday, December 19, 2009

sewing kit

This sewing kit was another one of my projects from the One Yard Wonders book. I had kept all of my sewing stuff in one box, but it was getting rather full since I started my sewing binge. So I needed somewhere to organize the things I use the most and a large organizer isn't in the budget right now. Besides, I wouldn't consider myself a sewing junkie (yet), so I really don't have that much stuff. Just the basics and a few notions that I picked up recently that will be used within the week.

So this design works fine for my needs right now, and, bonus!, it also works as travel kit in case I ever decide to bring my hobby with me.


I modified the design from the book a little bit to better fit my needs. I added pockets--including a double pocket (that's what I'm calling it) where there is an additional shorter sleeve on the outside of a pocket (see the snaps and buttons if you can)--and attempted an elastic band to hold a few other things. But I guess I probably should have known at the time what I wanted the elastic to hold because I couldn't really find much that was short enough to fit the trifold design. I decided to put the extra elastic there as well as my measuring tape but I have yet to find anything to fit the third space.

Oh well...I think it turned out great and it really does help keep me organized. And this was my first project to include bias tape on the edges of the pockets which I think give the pockets a more professional look (telling yourself this doesn't really hurt anyone).

Tuesday, December 15, 2009

wrist pin cushion


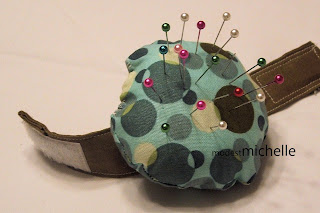
This is the first project that I created from the One-Yard Wonders book that I bought. I needed some place to put all of my pins and since I am constantly misplacing items, I thought that a wrist cushion would be the best way to go. I decided to make mine circular because I thought a circle look better with the dots on my fabric. The book makes the cushion a little more complicated than I made mine; I just sewed together 2 pieces of fabric cut into circles and stuffed it as much as possible because I didn't want my new long, pearl-capped pins (they're so stylish) to poke my wrist.

I used the instructions from the book to make the wrist strap but apparently I took too many liberties with the length. It would be nice if the strap was longer because the velcro only slightly overlaps. I don't think the velcro will come undone, but I would make the strap about an inch or two longer next time. I also sewed the velcro opposite of what the book told me to do.

The book said to sew the hooks (the rougher part) to the part of the strap that would face up from my wrist. But that didn't make any sense to me...I thought it should be the other way so that the hooks would face down and more easily grab the loops. But I was way wrong because, with the strap just a little too short, the rough velcro hooks rub against my wrist. So I would change that next time, too. But at least now I understand the intricacies of velcro.

You can also see in the photo that this project was completed before I understood the importance of the clipping curves and the art of slipstitching--you can see where I whipstitched the opening of the cushion closed.  I am already laughing at myself...

Monday, December 14, 2009

my new favorite book

I was at Barnes & Noble the other day trying to find a sewing project book. I had been through this section many times before and never found a book that had enough appealing projects to justify the cost (I'm on a tight budget). But this time I had a gift certificate, so I was determined to leave with something.

I was just about to give up (I had Logan with me, so I didn't really have time to spend searching the contents of each book) until I came across a book titled One-Yard Wonders by Rebecca Yaker. This book contains instructions to 101 projects (+5 if you get the B&N special edition) that can be completed with one yard of fabric or less. Hallelujah! For a girl on small budget who spends much of her time at JoAnn's rustling through the remnant section, this book is a gold mine.

There is so much packed into this book: storage solutions, totes and bags, baby gear, stuffed animals, things to wear, and the cutest little girls' outfits (for which I would have to borrow a young girl as I have none). This is definitely a book that I will use over and over again. I have already created five projects from this book and have looked to it for inspiration on a few others...probably the best $21 I have ever spent.