Sunday, February 24, 2013

fingerless mitts {knit & crochet}

My dad requested some fingerless mitts for Christmas, but I didn't quite get around to them. So I made some for him for his birthday.
 

He wanted some mitts to keep his hands warm since the circulation in his arms isn't as good as it used to be.  The hub (not) so willingly modeled these for me since they were too big for my hands.


I crocheted the hand and arms and held the yarn double to speed up the project.  Then I picked up stitches to knit a band for the fingers and the thumb.  I even added a little stockinette to the arm end of the mitts.  The stockinette rolls nicely and gives the mitts a professional finish.
 
I used a J hook to crochet and chained 23 for the start of the mitts near the fingers. This number created a large mitt perfect for my dad but much too big for me.  If I was going to make these for lady hands, I would probably only chain 19 which I would consider medium.
 
These fingerless mitts were very quick to whip up.  The first one took about 3 hours because I had to make all the design decisions.  The second didn't even take that long.  Two evenings and done!
 

Saturday, February 9, 2013

boys preppy cardigan

What do you think of Trent's new cardigan?


I completely improvised this design using simple raglan sleeves and v-neck shaping down to the belly.  The main color is a natural cream.  I added thin orange and light blue (which you can't really see in the photos but they are directly under the orange) stripes to give it a moden look.  The hub says he looks like a frat boy . . . mission accomplished!


Given that this was my first knitted sweater without a pattern, I did make some miscalculations.  For instance, this was supposed to fit Logan, my almost 7-year-old.  The arms are long enough for size 7 but the body was a little too snug for my liking.  And it surely wasn't easy to convince Logan to give it up to his little brother.  Trent claims to love it, yet he won't wear it in public.


This cardigan was worked from the top down in one-piece.  I even added faux side seams just for fun.  The seams are made of one purl stitch down the stockinette sides and it gives the cardigan a more professional look.  I've read that seams help keep a sweater from twisting  and give you some nice fold lines.  I never have a problem with my sweaters twisting and I don't care about fold lines, but I wanted to try it anyway.  They were easy to add and, at the very least, the cardigan looks like it could have been purchased at Old Navy or The Gap.


Even if I'm kidding myself about looking professionally made, this will be one of my favorites for a long time.  I love the unexpected orange edging along the neck and body ribbing.

This was a fairly quick knit for me.  It took about 3 weeks.


yarn name: Lion Brand Fishermen's Wool (main), Patons Classic Wool (stripes)
yarn type: 100% wool
colorway: Natural (main), Orange & Light Blue (stripes)
yardage: ~450 yards worsted (main), ~75 yards worsted each (stripes)

needle size: US 7 (5.0mm) circular and double-pointed

Friday, February 1, 2013

my driftwood sweater {a difficult lesson in gauge}


During a major yarn sale at JoAnn just before Christmas, I bought at least 10 skeins of Wool-Ease yarn.  I earmarked 6 skeins for a new sweater for me since my first one came out so well.  I had the Driftwood pattern in mind for my new sweater.  This is free pattern on Ravelry.

The pattern is wonderfully written and this was my first time using the contiguous sleeve method; this is a top-down sweater that looks like it has set-in sleeves but is actually worked seamlessly.  Sounds genious to me.  I just couldn't picture how the method actually worked, but I trusted the instructions and now it all makes sense.


I didn't make a gauge swatch or really even check my gauge until I was about to separate the sleeves from the body.  Big mistake.  Just like all the books try to tell me.  I got a little too cocky and thought I knew exactly what I was doing, but my gauge was way bigger than the pattern, and, of course, so was the top of my sweater.  I made some adjustments to the pattern at this point to try to keep it wearable, but things still turned out a little too large.

After I was done with the body, I tried on the sweater and it measured at least an extra 4 inches than I really needed.  So before I knitted the sleeves, I seamed up about 2 inches on each side of the body with a crochet hook.  This took the body in quite a bit but still kept the body proportional to the yoke.  I then moved onto the sleeves and picked up only the underarm stitches in the body that were appropriate for the new sizing.


And now that the sweater is blocked, I actually like it.  It's not my new true love, but it will find its place in my wardrobe.  A valuable lesson in gauge learned the hard way.


Friday, January 25, 2013

oversized chocolate-dipped cookies


Trent and I made these cookies today. We used this recipe for the cookies, but we used a large scooper and baked them for about 15 minutes.  When they cooled, we dipped the cookies in melted chocolated and sprinkled them with crushed oreos, chopped reeses pieces, and red jimmies.  A super fun alternative to the traditional birthday cake.

I usually don't post about food, but today is an exceptional day.  Today is the hub's 36th birthday.  This is his first birthday celebration since we lost Timmy.  I went through my first last November.  Leading up to my birthday, I felt like my brain was at odds with my heart.  My heart didn't want to feel happy . . . happiness just didn't seem right.  But my brain told me not to be the martyr.  Outwardly, I accepted birthday wishes from my family, but inwardly, all I wanted to do was crawl back into bed where I could dream about us all being together.

I didn't tell anyone that it was my birthday.  I had moved to a new department at work several months prior and no one would have known.  I had a support group meeting that evening and I chose not to share my secret there either.  So my birthday came and went with a comfortably quiet celebration with my husband and kids.

I have noticed subtle changes in myself over the last few months.  I now understand the true meaning of a birthday.  To celebrate a birthday is to be thankful for the chance at life.  I am thankful that my husband got the chance at life.  He is strong and supportive with a helpful heart.  He is an awesome father.  We share a love of movies, baseball, and long walks.  Today I celebrate his presence in my life and in this world.  Happy birthday, Tim.

Celebrate life with your loved ones and be sure they understand just how thankful you are to have them here with you.


Wednesday, January 23, 2013

a{nother} new hobby

As if I need another one . . .


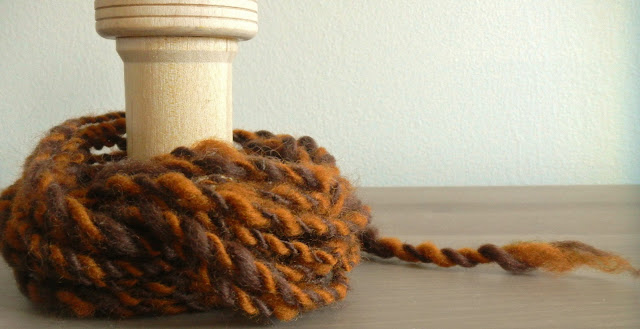
I wanted to try to my hand at spinning yarn, so my mother-in-law gave me a drop spindle and spinning supplies for Christmas.  So in my spare time, I've been working on creating my own yarn.  I spun two singles out of two 1/4 ounce Corridale rovings: toffee and chestnut.  Then I plied them together to even them out a little and see what would happen.  I ended up with a fall-ish thick and thin that was more fun to make than I expected.

I'm not sure what I will do with this one since I only have maybe 5 yards, but I am interested to see how it knits up.

Friday, January 18, 2013

my own capelet design


I knitted this capelet for my sister, Amanda, for Christmas.  She didn't request anything handmade from me (in fact, she may not even like handmade things) but I had this idea and I wanted to go for it.  She lives in Arizona where it's above 50 in the middle of winter, so I wanted to make her something light that she could wear around without making her sweat.  This little capelet was my answer.


I used bulky weight yarn and size 10 needles so I could complete the project in the week that I had left before Christmas.  I knew that I wanted a capelet knit in the round without any type of closure, simply slipped over the head to rest on the top of the shoulders. 

Since the top half would be so plain, I wanted to use something more substantial for the bottom half.  I thought about using a lace pattern but with the alpaca yarn, I knew the lace would blend too much.  And then I found the saxon braid.  This intricate cable certainly holds its own and becomes the focus of any project. 


And believe it or not, it's a pretty simple design to follow.  This was my first experience reading a chart and although I messed up a couple of times, I don't think that anyone unfamiliar with knitting cables would be able to tell.

I think it's a perfect length for a capelet and I hope it serves her well in the warm climate of Az.


Tuesday, January 8, 2013

knitting a blanket for christmas {that's crazy}


My lovely sister, Laura, who has always supported by love of fiber and diy crafting requested a knitted blanket as my Christmas present to her.  This was back in November.  I informed her that there was no way that I would be able to finish the blanket before Christmas, not only because it would take for.ev.er to knit a blanket but also because I had so many other projects on my Christmas list.  She graciously offered to wait longer as long as I agreed to knit one for her.

My sister currently lives and works in Mexico.  While she is gaining valuable business and life experience abroad, I know she misses us loved ones here in the States.  So I decided to give the blanket an admirable effort to be finished by Christmas.  And with the help of super bulky yarn and size 15 needles, I came through with time to spare.


Laura's only specification was that the blanket be gray or navy.  These are her signature colors.  And other than that, I had free creative reign.  So, naturally, I chose a gold color.  See, I don't take orders very well.  I need complete creative reign apparently and I thought that gray or navy would be too boring for such a large project.  You can buy gray or navy knitted afghans just about anywhere, and I wanted to use a color that was a little harder to come by.

I chose the Winter Lace Afghan pattern from Lion Brand available for free on Ravelry.  I chose the pattern before the yarn and I really thought that the gold (it looks like butterscotch) would be a great fit for the beautiful lace pattern.  I increased the size of the borders because I like thick borders on my quilts and I assumed the theory would transfer to knitwear, too.  I love the result.


I had to stop the lace pattern after 6 repeats instead of 7 like the pattern calls for, but the blanket still measures a healthy 45 inches by 55 inches . . . perfect for throw.  And since I used super bulky weight yarn, the blanket is heavy, but it's intensely warm.

At Christmas time with my family, I heard her planning her next blanket request.  As long as it can wait until her birthday in April, I'm down with another.  And there's always next Christmas.

Tuesday, January 1, 2013

striped knit christmas stockings


So the hub said to the boys one day, "I think mommy should knit us some Christmas stockings."  If I wasn't so excited that he (pretty much) requested something from me, the more logical part of me would have told him that he was crazy if he thought it would happen before this Christmas.  But few challenges have passed me by without some sort of effort.

The Challenge
  • knit 5 Christmas stockings before Christmas, preferrably at least a week before Christmas day
  • all five must be similar to show uniformity but not exactly the same
  • they must be oversized (this is one of the hub's problems with our current stockings)
  • the pattern must be simple enough to work without too much thought
  • they must be knit in the round (I refuse to knit flat when I don't have to)
Believe it or not, Ravelry doesn't have that many stocking patterns that do not include fair isle.  Don't get me wrong.  I would love to make 5 stockings using fair isle but that doesn't really fit any of my specs.  So I had to improvise.  And because I've never made a sock before, I really had to work at the toe and the heel to get them right.


These are the three that I managed to finish before Christmas, one for each of my three boys.  The blue is for Logan, the green for Trent, and I chose purple for Timmy's stocking.  For all the stockings I used stash yarn.  Timmy's stocking is purple (which I've chosen as his signature color because it would never be claimed by any other boys in my house) and I used leftover yarn from my Comfort Buttony that I knitted for myself; that was a special way for me to tie the two of us together.


 These stockings definitely fit the bill.  I used the same pattern for each but, depending on the yarn, the sizes are a little different.  Trent's stocking is the smallest at 16 inches around and 20 inches long while Timmy's stocking measures about the same 16 inches in circumference but a whopping 24 inches long.  That's more than half the length of my 6-year-old!  So these are definitely big enough for Santa to fit all the Christmas goodies!


Merry Christmas to my three darlings.


Monday, November 12, 2012

my comfort cardigan


I finished it.  My first adult-sized knit cardigan.  I started this project in early October with some early birthday money that my dad gave me.  The hub took me to a local yarn shop (turns out it wasn't as local as I thought) and I bought 5 skeins of this Dried Plum Berroco Vintage yarn.  This was an exciting project for me all around because it was only about my second time at a real yarn shop and my first time buying more than 2 skeins of yarn at once.

I am also happy with myself because this is the first project since we lost Timmy that I didn't cry after I was finished.  I think that I would cry because I felt like all the time that I spent while I was knitting, being content just to sit there with my needles and work on a project while my mind steadily analyzed my feelings, was just a waste of time.  I was happy while the project was in progress, but once I was finished it didn't change anything.  I still missed my little boy and there was nothing I could do to make the raw pain go away.

But this time I didn't cry.  This time I was so excited to have a cardigan that I knit myself.  I've been wearing it every day with a smile since I finished.  It was quite a surprise to me that I actually felt happy to be done.  I expected the sadness to rush in again and overtake my accomplishment, but it didn't this time.  I am grateful to my glorious Lord for providing me this strength and filling me with peace.  I decided to make this cardigan to comfort to myself.  Whenever I wear it I will think of Timmy.  Whenever I want to think of Timmy, I will wear it.


I used the free Buttony pattern on Ravelry for this cardigan.  The asymmetrical button band adds interested to an otherwise boring stockinette cardigan.  I love that it fits me just right because it was made just for me.  I was able to try it on while I worked so I could make sure that I had my measurements just right.

I tried to add a stockinette neck to the top, but it just didn't look right.  I couldn't get the moss stitch that I included on the very top to lay properly, so I folded the neck over and stitched it in place.  This gave me a taylored collar kind of look and I love it.

It has been a lovely and peaceful birthday.  I hope Timmy is smiling at me today.  I love you, pumpkin.


yarn name: Berroco Vintage
yarn type: 50% acrylic, 40% wool, 10% nylon
colorway: Dried Plum
yardage: ~900 yards worsted

needle size: US 8 (5.0mm) circular and double-pointed

Saturday, October 20, 2012

rigid beanie


I knitted this hat without a pattern.  Hats are my sanctuary.  They are so quick, and you can customize each one to make it different than the last.  I just wish you could wear them all year.  Then I would have a justification for all the hats I've been making lately.


Both yarns are a wool blend.  I love the colors in the contrast yarn.  I tried to showcase the multicolored yarn by alternating knit and purl rows in the round (which would be garter stitch if I had knit it flat) and I like the results.  From the right side, the ridges make the colors pop.  And I think that the gray blends into the background, leaving the fun colors in the contrasting yarn for the spotlight.

I used the same crown shaping as with this hat.  I really enjoy the look of this shaping, and it keeps me interested while I'm knitting.  I never get bored with it.


When I try this again, I will make it a little longer.  This hat is more of a beanie and that's not what I was going for.  It still looks nice and fits well, but I like my hats with a little more depth to be able to pull down further over my ears when it gets windy.  Probably another inch of stockinette after the contrasting garter ridges would be perfect!

Here is the general pattern guideline for worsted weight yarn:

Main color (MC): I used Lion Brand Wool-Ease worsted in gray.
Contrast color (CC): I used Sensations It's A Wrap bulky in purple/rose.

Cast on 80 stitches in CC for adult sized hat & join to work in the round.
Change to MC.
Knit 2x2 rib for 2 inches.
Knit stockinette in MC for 1 inch.
Change to CC.
Knit one round.
Purl one round.
Alternate knit and purl rounds for 3 inches.  Be sure to end with a purl row.
Change to MC.
Knit stockinette for 1 inch.
Shape crown as desired.

Next time, I might try these changes:
1/2 inch stockinette in main color before ridges instead of 1 inch
3 inches stockinette in main color after ridges before decreasing


yarn name: Lion Brand Wool-Ease (main), Sensations It's A Wrap (contrast)
yarn type: 80% acrylic, 20% wool (main);  75% nylon, 25% wool (contrast)
colorway: Gray (main); Purple/Rose (contrast)
yardage: ~100 yards (main); ~30 yards (contrast)
needle size: US 8 (5.0mm) circular and double-pointed